Adding a string replacement to your site is simple once you’ve got the plugin set up and installed.
Step 1 – Install & activate the plugin
Install & activate the plugin as you would any normal plugin. If in doubt – check out the the plugin installation article in the WordPress Codex.
Step 2 – Find out the string to change
You can use the plugin to change strings in either WordPress core, or plugins you have on your site. The only requirements is that the plugin must have correctly marked their strings for translation. Translated strings are generally wrapped in __(), _e(), or _x(), for example:
$foo = __('This is a translatable string', 'plugin-domain');In many cases, finding out the original string is straightforward. For example if you want to change a button that says “Register” to “Get involved”, then the chances are that the original string will just be “Register”. Sometimes though the string may be more complex, and you may have to browse the source code of the plugin to confirm the exact string – the plugin can’t match partial strings.
As well as knowing the original string, you also need to know the plugin “text domain”. This is the second argument to the translation function – in our example above it would be plugin-domain. The text domain is an identifier for which plugin or module of WordPress the string resides in. Although the terms are similar, this is not related to the domain name of your website (e.g. http://www.example.com).
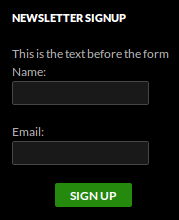
 As a worked example, we’re going to make a change to the forms created by the Campaign Monitor Ajax Forms plugin. By default, the form includes a submit button that reads “Register”. It’s a pretty safe guess that this is the string we need – but we also need to know the textdomain. Taking a look in the plugin source, we can see that the button is output using the following code:
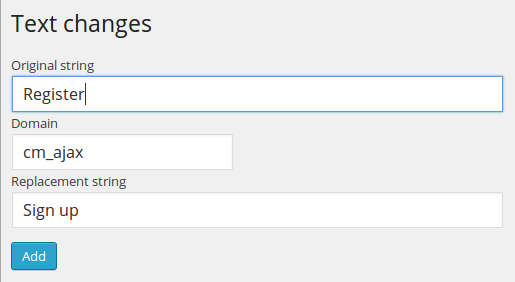
_e('Register', 'cm_ajax');This confirms that “Register” is the correct string, and also gives us the text domain – “cm_ajax”. Now that we have these, we can go ahead and set up our replacement.
Step 3 – Setup the string replacement
In your WordPress admin panel – you can now go to the Say What plugin settings page – you can find it under Tools » Text Changes. You’ll be presented with a list of your current replacements, as well as a link to add a new item. Clicking this will show the replacement form, we can fill it in with the original string, text domain, and our desired replacement string:
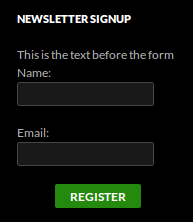
We save the replacement, and check the form on the front end and our change is successfully displayed: