This short guide will talk you throw setting up the Social Checkout for WooCommerce plugin – choosing the social networks you want your customers to share to, and setting up customised social settings, and messages.
Step 1 – Install & activate the plugin
Install & activate the Social Checkout for WooCommerce plugin as you would any normal plugin. If in doubt – check out the the plugin installation article in the WordPress Codex.
Step 2 – Set up the Social Checkout Plugin
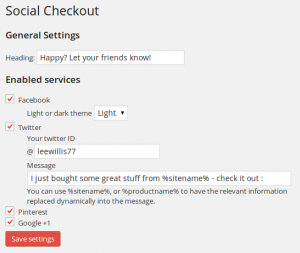 Log into your WordPress admin area, and go to WooCommerce » Social Checkout. You’ll see the Social Checkout for WooCommerce settings screen.
These are the only settings you need to configure – so you’ll soon be up and running.
First – set the heading – this will be used to introduce the social sharing block after checkout.
Once you’ve done that you need to choose which social networks you want to offer. This will depend on your business, and which networks are most popular with your customers.
Step 3 – Set network-specific settings
If you enable a network, you’ll be able to enter settings specific to that network.
Choose whether to display the light or dark facebook widget.
Enter your business’ Twitter account details. This will be added to the suggested tweet, and customers will also be prompted to follow you after sharing. You can also choose a default message, including using variables such as %sitename% or %productname%. These will be replaced in real time depending on what the customer ordered, and is choosing to share.
Step 4 – You’re done!
The social sharing buttons will be shown after checkout, and your customers encouraged to share their purchase.