It’s easy to get up and running with the WooCommerce Price Filter Pro plugin – just follow the step by step instructions below.
Step 1 – Install & activate the plugin
Install & activate the plugin as you would any normal plugin. If in doubt – check out the the plugin installation article in the WordPress Codex.
Step 2 – Add a widget
 Head to Appearance » Widgets and drag the WooCommerce Price Filter Pro widget to your sidebar of choice.
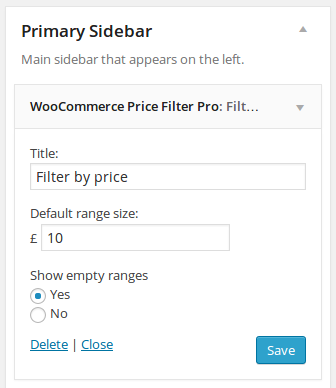
The widget settings let you set the title of the widget, and the default range size. In our example each range will over £10 ranges, e.g. £0 – £9.99, £10 – £19.99 etc.
Note: This is the default for the widget, but you can override these settings on a per category basis, so for example if you have one category which contains higher, or lower value products you can have the widget adapt accordingly.
You can also choose whether to show empty ranges, if not they will be skipped, and only ranges that include products will be shown.
You’re now up and running. Check out our article on category specific settings for more information.