Sending extra fields to MailChimp after purchase

The WP e-Commerce MailChimp plugin automatically sends customer information, and e-Commerce data to MailChimp straight at point of purchase. Depending on your precise business needs, you may want to send other information along with the subscriber information.

The plugin contains a filter scmi_custom_fields which passes you the current list of fields being sent to MailChimp, and the purchase log ID. You can attach to this filter, and modify the existing fields, or add additional fields.

The code below shows how you can grab additional information from the WP e-Commerce purchase log and send it to MailChimp along with the subscriber information. In this example, we’re going to grab the customer’s postcode and send it along into a MailChimp field called POSTCODE.

function wpec_mc_custom_fields( $custom_fields, $purchase_id ) {

    global $table_prefix, $wpdb;

    // Retrieve the information we want from the purchase log record
    $sql = "SELECT unique_name,
                   value
              FROM {$table_prefix}wpsc_submited_form_data sfd,
                   {$table_prefix}wpsc_checkout_forms cf
             WHERE sfd.form_id = cf.id
               AND sfd.log_id = %d";

    $product_info = $wpdb->get_results(
    	$wpdb->prepare(
    		$sql,
    		$purchase_id
		),
		OBJECT_K
	);

    if ( ! $product_info )
        return $custom_fields;

    // Add the information to the data sent to MailChimp
    $custom_fields['POSTCODE] = $product_info['shippingpostcode']->value;

    return $custom_fields;
}
add_filter('smci_custom_fields', 'wpec_mc_custom_fields', 10, 2);

Restricting WooCommerce shipping rates by quantity

Sometimes you want to provide rates but limit their availability based on the size of the order – for example if your carrier only offers a certain set of rates for packages up to a certain size. The WooCommerce Pro Shipping plugin already lets you set up tiered rates by weight, or item quantity, but there’s no way to set a maximum quantity for a particular rate. Fortunately there are filters in place that let you achieve that fairly easily. The example below limits a specific rate to a maximum of 5 items – the rate won’t be offered if the cart contains more than five items.

function limit_rate_by_item_count($availability, $rate, $rate_id) {
    global $woocommerce;

    if ( $rate_id == 1 ) {
        if ($woocommerce->cart->cart_contents_count > 5) {
            return false;
        }
    }
    return $availability;
}
add_filter( 'woo_ps_availability', 'limit_rate_by_item_count', 10, 3);

Time limited shipping rates

Sometimes you want to limit the availability of certain shipping rates. The Premium Shipping plugin has filters that allow you to change the availability of shipping rates according to whatever logic you want.

The example below for example blocks a rate once a certain date has passed – great for holiday-season shipping cut-offs.

// Rate ID 1 should not be available after 20th December 2013
function limit_rate_by_date( $availability, $rate, $rate_id ) {

	// Our function should only apply to rate ID 1
	if ( $rate_id != 1 )
		return $availability;

	// Calculate the date as a UNIX timestamp
	$expiry_time = '2013-11-25T22:36:00+00:00';
	$unix_expiry = strtotime( $expiry_time );

	// If the current time is after the expiry, block the rate
	if ( time() > $unix_expiry )
		return false;

	// Otherwise return the availability of the rate as it would be
	return $availability;

}
add_filter( 'ses_wpsc_ps_availability', 'limit_rate_by_date', 10, 3 );

Adding custom fields to CSV exports

If you’re using CSV exports for passing data to 3rd parties, for example fulfilment companies, you often need to provide fields in the CSV that don’t exist in WP e-Commerce – for example your account number, or pickup address.

The dashboard plugin contains filters that allow you to define your own columns, and to specify a function to be called to generate the data for that column.

As an example, we’ll define a new column Carrier Account Number, and populate it with a fixed value AC12345.

The first step is to register a new field – here’s the code:

function add_fields_to_csv_exports( $fields ) {
	$fields['carrier_account_number'] = array(
		'Title' => 'Carrier Account Number',
		'ShowOn' => 'Both',
		'QueryID' => 'output_account_number_in_exports()',
	);
	return $fields;
}
add_filter( 'ses-wpscd-csv-fields-available', 'add_fields_to_csv_exports' );

You can register as many fields as you want inside the function – just add them all to the $fields array before returning it. Here – we’re just registering a single field.

The important sections are as follows:

Title
This is what will be shown on the field selection screens, and on the header row.
ShowOn
This controls whether the field is available on Order exports (‘Orders’), Order line exports (‘Lines’), or all exports (‘Both’)
QueryID
This specifies how the data for the field show be generated. Here we’re just indicating that the export generator should call the function output_account_number_in_exports

Then all we have to do is specify our function:

function output_account_number_in_exports() {
	return 'AB12345';
}

Once that’s done – your fields will show up on the field selection screen for standard, and scheduled exports, and you custom function will be called to output the data for each row on the export.

Including “Closed Orders” in dashboard reports

The WP e-Commerce dashboard & export plugin provides a number of reports and graphs tracking store performance, such as number of items ordered, revenue total etc. These reports differentiate between “successful” and “unsuccessful” orders (E.g. orders which have been cancelled, or which the customer placed, but never paid for).

Out of the box, successful orders are ones with a status of Order Received, Accepted Payment, or Job Dispatched. Orders with a status of Closed Order aren’t included. If you’re stores workflow means that orders in this status should be counted, then as of release 6.2 you can now have these included by adding a simple filter to your theme’s functions.php:

function wpscd_add_closed_orders ( $statuses ) {
	$statuses[] = 5;
	return $statuses;
}
add_filter ( 'ses_wpscd_successful_statuses', 'wpscd_add_closed_orders' );

Custom Fields in your Campaign Monitor signup forms

We previously talked about ways that you could use filters to add Custom Field information to the signups generated by our WordPress Ajax Campaign Monitor Widgets plugin based on fixed values. But what if you need to capture information from customers and add it to the signups?

Let’s show a quick example of how you might achieve this. In our example we’re going to ask people to choose their favourite colour. For the purposes of this article we’ll assume you’ve already got the field set up at Campaign Monitor, with the tag FavouriteColour (Check out our previous article if that means nothing to you!)

As well as the filters for actually adding the form data to the request sent to Campaign Monitor, the plugin also includes some hooks that you can attach to to generate your form fields on the front end:

  • cm_ajax_widget_before_form_fields
  • cm_ajax_shortcode_before_form_fields
  • cm_ajax_widget_after_form_fields
  • cm_ajax_shortcode_after_form_fields

The _before versions are for adding fields before the name and email fields, and the _after versions for if you want them to be added after the name and email. There are versions for widgets and shortcodes, and the hooks get passed the widget or shortcode ID so you can display different information for different forms if you like.

In our example, we want the colour choice to be added to all forms. All we have to do is right a small bit of code that attaches to both the shortcode, and widget hooks, and outputs the HTML for our form field. Here’s a quick example:

function render_extra_form_field ( $context_id ) {
    echo '<label for="FavouriteColour">Favourite Colour</label>:';
    echo '<input class="widefat" type="text" name="FavouriteColour" >';
}
add_action( 'cm_ajax_widget_before_form_fields', 'render_extra_form_field' );
add_action( 'cm_ajax_shortcode_before_form_fields', 'render_extra_form_field' );

Then we need to pick up that data when it’s submitted, and include it in the Campaign Monitor request:

function register_extra_custom_field ( $custom_fields, $context_id ) {
    if ( isset( $_POST['FavouriteColour'] ) )
        $custom_fields[] = [ "Key" => 'FavouriteColour', "Value" => $_POST['FavouriteColour'] ];
    return $custom_fields;
}
add_filter( 'cm_widget_custom_fields', 'register_extra_custom_field', 10, 2 );
add_filter( 'cm_shortcode_custom_fields', 'register_extra_custom_field', 10, 2 );

And that’s that – whatever your customers enter into the extra field will be stored in the Custom Fields in your Campaign Monitor account. You have full control of the HTML you add, so you can add checkboxes, select boxes – whatever is appropriate!

Reports for non-admin users

Out-of-the-box, the WP e-Commerce Dashboard plugin provides store reports to logged-in, admin level users. This is deliberate – to protect your customers data from prying eyes.

However, it’s often the case that you want other users to be able to view the reports – maybe warehouse staff, or admin staff who need the data, but who you don’t want to give admin access to your whole website.

The WP e-Commerce Dashboard plugin uses standard WordPress capabilities to control access to the reports, this allows you to grant the capabilities to roles as it suits your business.

Since it uses standard WordPress functionality, you can use any plugin of your choice to manipulate the roles and capabilities (In fact if you’re at home in PHP, you could just code up a few lines to add the capabilities to your chosen roles, but that’s probably for another day …).

rolemenuFor the sake of this article, we’re going to use the “Members” plugin by the well-know plugin developer Justin Tadlock – the rest of this article assumes you’ve got it installed and activated

To start with you’ll need to decide if you’re going to add the capability (“view_store_reports”) to an existing role – or create a new role for your users. For this article, we’ll be adding the capability to the “Editor” role.

First of all – open up the “Users” menu, and choose the “Roles” item.

Next, we’ll pick the role we want to edit. As we said earlier, for this article we’ll be adding the capability to an existing role “Editor”. If you’re wanting to create a new role, then you’d do that now. However, we’re going to choose the “Editor” role from the list, and choose “Edit”.

custom-roleWe’ll choose the option to add a new capability, and enter “view_store_reports” – which is the capability that the WP e-Commerce Dashboard plugin uses to control access:

And that, as they say, is that. The users will now have the capability, and will be able to see all of the dashboard widgets, and access the Sales Export features.

If you want more fine grained access, then don’t give your users the “view_store_reports” capability, but instead choose the specific capability you need from the list below:

view_store_orders_widgetView the Recent Orders dashboard widget
view_store_ratings_widgetView the Recent Product Ratings widget
view_store_sales_widgetView the Product Sales widget
view_store_stock_alertsView the Stock Alerts widget
view_store_items_to_ship_widgetView the Items to Ship widget
view_store_revenue_graphView the Revenue graph
view_store_sales_graphView the Sales graph
view_store_sales_exportView the CSV Export
schedule_store_reportsSchedule a CSV Export

Adding Custom Fields to your Campaign Monitor signups

Campaign Monitor supports the concept of “custom fields” so that you can store extra information about your mailing list subscribers.

You might use this to track who signed up via a particular widget,  promotion, or page on your site. We’re going to run through a straightforward example of how you could set this up using our WordPress Ajax Campaign Monitor Widgets plugin to store a “Promotion” field against list subscribers.

custom-fields-1

Setting Up Your Custom Fields

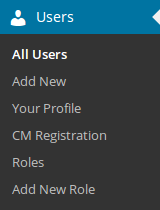
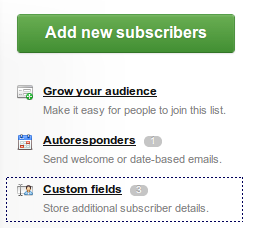
First – set up the custom field you want to store against your Campaign Monitor list. Log into your Campaign Monitor account, choose your list, and click on the “Custom Fields” link under “List Settings”.

This will allow you to set up the custom fields that you want to use for this list.

Note: All Custom Fields are optional so you won’t break any existing forms by doing this.


Once you’re on the Custom Fields page, the next step is to create your fields, in our example, we’re going to set up a single field called “Promotion Source”.

custom-fields-2

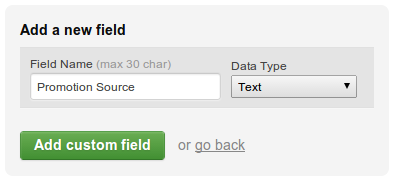
Hit “Add Custom Field”, and your field will be added to the list at the bottom of the page. Make a note of the Personalization Tag that’s been assigned to your field.

custom-fields-3

In this case our field has been given the key “PromotionSource” – you’ll need to use this in your setup shortly.

Making WordPress Set Your Custom Fields

Now that the Campaign Monitor knows about the custom fields you want to use, now’s the time to make sure that they get populated by our WordPress widgets.

At time of writing, there’s no way to extend the forms that users see when they’re signing up using our widgets (It’s on our To Do list!), but in our case that’s not necessary as we simply want the widgets / shortcodes to populate fixed information (ie – not provided by the user) into the fields.

So, our plugin provides two WordPress filters that we can use to add information to the custom fields:

cm_widget_custom_fields ($current_fields, $widget_id)
cm_shortcode_custom_fields ($current_fields, $shortcode_id)

As you can see, both filters get passed some information. For our first example, we’ll assume that we want any of our online signup forms to record a “Promotion Source” of “Website” – later on we’ll cover some more advanced examples.

To add the fields, and set them to website, we’ll add a small section of code to our WordPress theme’s functions.php:

function add_promotion_custom_field( $current_fields, $widget_id ) {
    $custom_fields[] = array( "Key" => 'PromotionSource', "Value" => 'Website' );
    return $custom_fields;
}
add_filter( 'cm_widget_custom_fields', 'add_promotion_custom_field' );
add_filter( 'cm_shortcode_custom_fields', 'add_promotion_custom_field' );

You’ll notice that we’ve set the “Key” to PromotionSource, which is the value we got from the Campaign Monitor personalization tag earlier. We’ve also attached our function to both filters so it will get run whether the signup form is a widget, or a shortcode.

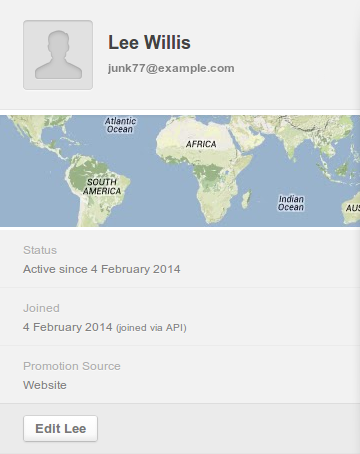
The result is that our subscriber gets created with the custom field value set to “Website” :

custom-fields-4

Advanced Examples

What if we want to differentiate between people who signed up from the sidebar widgets, or those who signed up from dedicated sign-up pages on our site? The following code attaches the filters to two different functions so that we can change the Promotion Source that gets set.

function add_widget_custom_field( $current_fields, $widget_id ) {
    $custom_fields[] = array( "Key" => 'PromotionSource', "Value" => 'Website-Sidebar' );
    return $custom_fields;
}
add_filter( 'cm_widget_custom_fields', 'add_widget_custom_field' );

function add_shortcode_custom_field($current_fields, $shortcode_id) {
    $custom_fields[] = array( "Key" => 'PromotionSource', "Value" => 'Website-Signup-Page' );
    return $custom_fields;
}
add_filter( 'cm_shortcode_custom_fields', 'add_shortcode_custom_field' );

If you get really advanced, then you can use the additional information passed into the functions to set different values based on the particular widget, or shortcode that the form belongs to. This can be useful, for example, if you want to identify people who sign up from a particular widget or shortcode.