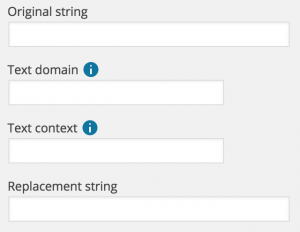
 When setting up string replacements with the Say What? plugin, you’re asked to provide a number of different bits of information, the original string, the context, the text “domain” and the replacement you want to use.
Finding out the right information to enter into these fields can be straightforward if you’re lucky. However, if you’re dealing with complex plugins that feature variable substitution, or complex string replacements, finding the right information can involve delving through code.
The Say What? Pro plugin includes a “String Discovery” feature that’s designed to make the process of finding the right string as straightforward as possible.
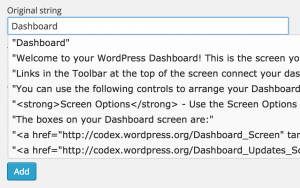
 Simply turn on the feature, browse to the page containing the strings you want to change, then head back to add your translation – the original string field will autocomplete captured suggestions, and fill in all of the relevant information when you select a string to change.
Check out our video walkthrough below, or read through the transcript below:
I’m going to talk to you today about changing text on your WordPress site. Obviously – we’re not talking about content you edit yourself – posts, pages etc. but the text, and content that is provided by plugins, or your theme.
We’re going to be looking at the Say What Pro plugin, let’s get started!
We’re going to walk through how to use the String Discovery feature in the Say What? Pro plugin to change some of the text that is generated by WooCommerce to customise the user experience a little bit. Let’s start with the “Add to Cart” link on our product pages – maybe we want to change that to something else.
We’re logged into WordPress already – so let’s go and take a look at the Say What? Pro plugin. The plugin sits under Tools » Text Changes. You can see here that we don’t have any replacements set up already – let’s try and add one. Now, in order to do its job – the plugin needs to know a few things about the string you’re trying to replace. It needs to know:
- the exact string as it appears in the plugin, or theme.
- the text domain – a unique identifier which says which plugin or theme generated the string
- additional “context”, so where a string is used to mean two different things in different places
- And finally, we get to put in our replacement – what we want to change the text to
Now – if you’re happy checking through plugin, or theme code, you can normally find the information you need for these pretty quickly. If that’s the case, then you can use the free version of the plugin – Say What? It will let you set up string replacements putting this information in manually and can work really well – particularly if you only have a few strings to change, and / or you’re happy hunting through code. If you’re not a code-person – or you have a lot of changes to make though, that can get pretty time consuming.
The main reason for this video though is to look at the String Discovery feature offered by the Pro plugin, that can make setting up replacements a whole lot easier. We can see there’s a tab for this on the settings page – let’s take a look.
There’s some explanatory text on the page, but the summary is that you can:
- turn on the feature
- visit the parts of the site you want to change
- have the plugin capture all the potential string changes on those pages
- make the process of setting up a replacement as simple as picking from an autocomplete list
We’ll try it out – remember we want to change the Add To Cart button text in WooCommerce. We enable the feature, then – we’ll go back to our product page. We’ll reload that page so that the plugin can capture the strings.
If you’ve got a few changes to make, on different pages, you can go and visit them all now – there’s no need to do one page at a time, you can capture all the strings you need in one go. For this demo we’re just doing strings on this one page. We’ll head back to the Say What admin page and say that we want to add a new string.
Now – this page looks the same as it did before – there’s no real change. The plugin still needs all of this information to set up a replacement. However, now that we’ve captured some strings when we start typing in the original string box we’ll start seeing some autocomplete suggestions. Let’s see what happens when we start setting up our Add to Cart button change.
We’ll start typing in the Original String entry field, and we’ll get some autocomplete suggestions of strings that were used in the pages we visited. We can see the Add to cart text is there as an option. If we pick that, then it will fill in the original string, and the text domain. If there was a context attached to that string, then that would get filled in as well.
We didn’t have to dig around in code to find those, we didn’t have to worry about whether we’ve typed them in correctly, the plugin takes care of that for us. All we have to do is pick the autocomplete item, then set our replacement text at the bottom.
We’ll save that, and we can see it gets added to the list of replacements. If we decide we want to change that overridden text then we can just edit that item at any time and change the replacement text. Let’s see how that looks on the front end of the site.
So, this was our Add to Cart button, we’ll reload the page, and we can see that Add to Cart has been changed, and replaced with our new string. Easy!
Let’s take one more quick example, on this same page – we’ll change the Search Products… text up in the search box here. This is a good example, as the replacement needs a text domain, a context, and the original text is probably a bit different from what you might expect.
So – we’ll head back to the Say What admin pages, add a new string, and start typing. We can see that there’s a few suggestions for “Search Products”. This is a great example of where the String Discovery feature can be really useful. We might have guessed the text domain as WooCommerce, and we might have taken a guess at the original string begin Search Products followed by three dots. Of course that wouldn’t have worked as we would have missed the context, and the fact that the ellipsis is the proper HTML character, not just three individual full stops.
If we pick the autocompletion though all of that comes through, and we can just enter our alternative text, and save.
Looking at the product page again, we can see that the text has changed.
So – that’s us all done for today.