String discovery of localised strings

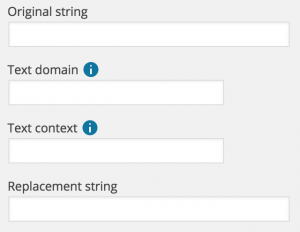
The String Discovery feature of Say What? Pro makes it easy to find strings to change or replace by searching, and providing search suggestions. This process makes it easy to get the text domain, and text contexts right without having to delve through code.

If you’re running WordPress in a non-“English (US)” language things could still be difficult since String Discovery only searched the original (English (US) language) strings, so you needed to know what the string was in that to find it easily. That’s now changed with the latest release of the plugin, allowing you to search for strings in either the original form, or the translated string.

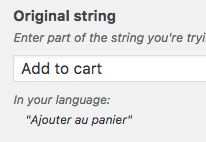
The auto-complete suggestions will show the localised string by default, but also let you know that it’s a translated string, and provide the original for information.

When you choose a replacement, the original string is what is used to set up the replacement, with the translated version shown for information:


Import / Export string replacements

Sometimes you may have multiple string replacements set up that you want to re-use elsewhere. Perhaps you’re moving between development / staging / production sites and want to take your replacements as-is without worrying about manual error transferring them. Alternatively, you might have a set of replacements that you want to apply to multiple sites.

Say What? Pro makes the process simple, offering easy export to CSV for all replacements, and corresponding import features as well. To get started, simply export your replacements using the Export Replacements button on the main Text Changes page.

The plugin will generate, and download a comma separated file (CSV file) containing your configured replacements. This is a plain text file that can be edited in a text editor, or spreadsheet application (Microsoft Excel or similar). This allows you to remove, add, or changes replacements if you like before importing to another site.

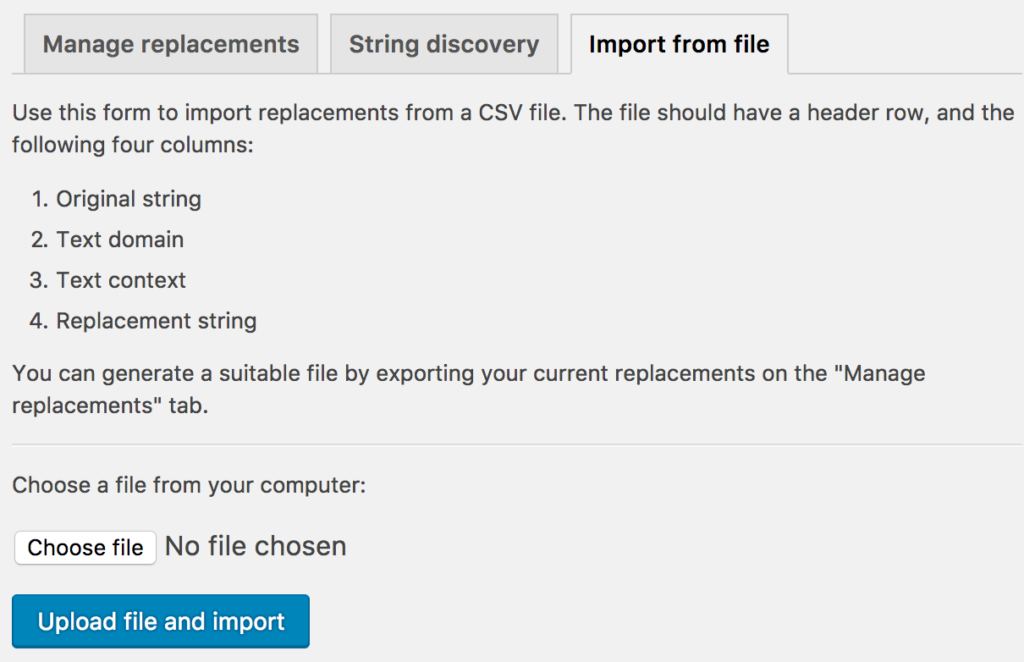
To import your replacements, simply click on the Import from file tab, upload your file, and your replacements will be added to the system.


Multi-lingual string replacements

The Say What? Pro plugin allows you to easily change text on your WordPress site by overriding a plugin, theme, or WordPress core string with a replacement of your choosing.

This works well for sites that are in just one language. However, when you have a multi-lingual store you may want to provide different replacements for each of the languages you operate in. The 2.1 release of the Pro plugin now lets you set up replacements that apply everywhere, or just to specific languages if you’re running one of the supported multi-lingual plugins*.

In this screenshot, the first replacement will apply in all languages, except for French, where the second replacement will be used instead.

Check out multi-lingual string replacements with Say What? Pro today.

*WPML, Babble, Polylang, and WPGlobus are currently supported.

Hiding Social Sharing links in My Account

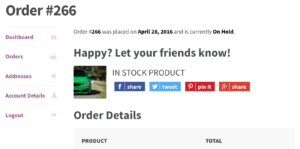
Picture of sharing links in My Account areaThe Social Checkout for WooCommerce plugin adds sharing links to the order confirmation page, and also to the View Order page in the My Account area.

If you don’t want these additional links to show in the My Account area then they can be removed with a simple snippet placed in either a site specific plugin, your theme’s functions.php file, or using something like the Functionality plugin.

Here’s the snippet to use:

remove_filter(
    'woocommerce_view_order',
    array( $WC_Social_Checkout_Frontend, 'social_checkout' ),
    0
);

Only show one set of share icons at checkout

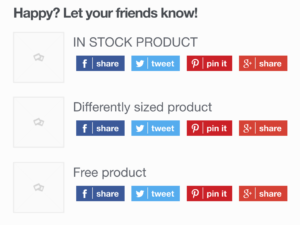
Social share icons for each item in an orderThe Social Checkout for WooCommerce plugin by default shows a set of social sharing buttons for each item in the cart – up to a maximum of 5 items.

This can work really well, but some sites may want to always just show a single set of share icons for the whole order.

The plugin does this by default if there are more than five items in the order – to avoid slowing down the page loading multiple social network javascript buttons.

However – if you want to always just show a single set of share icons for an order then you can implement a small snippet to force the plugin to always show just one set.

function lw_woo_sc_share_individual_items( $show_individual_items, $items ) {
    return false;
}
add_filter( 'woo_sc_share_individual_items', 'lw_woo_sc_share_individual_items', 10, 2 );

Just place the code above into your child theme’s functions.php file – or into a functionality plugin, and the plugin will only ever show a single set of share buttons at checkout – no matter how many items were in the order:

Single set of social share icons for whole order


Overriding social sharing URL

The Social Checkout for WooCommerce plugin allows you to create social sharing links at the end of your checkout process. The links that are shared bring people back into the WooCommerce product pages directly which is normally exactly what you want. However – sometimes you may want to send people to a different URL – maybe a membership page, a special offer landing page or your store front page.

The social checkout plugin includes filters that allow you to override the URL that is shared easily. The example below shows how you can change the URL to a “membership page” for all products.

function lw_woo_sc_item( $item, $product, $order ) {
    $item->permalink = 'http://www.example.com/membership';
    return $item;
}
add_filter( 'woo_sc_item', 'lw_woo_sc_item', 10, 3 );

Of course – you can do whatever you like with the URL – alter it only for some products (by checking the contents of the $product), or just add to it – for example to add tracking arguments or similar.

String discovery

Screenshot 2015-04-19 21.19.32When setting up string replacements with the Say What? plugin, you’re asked to provide a number of different bits of information, the original string, the context, the text “domain” and the replacement you want to use.

Finding out the right information to enter into these fields can be straightforward if you’re lucky. However, if you’re dealing with complex plugins that feature variable substitution, or complex string replacements, finding the right information can involve delving through code.

The Say What? Pro plugin includes a “String Discovery” feature that’s designed to make the process of finding the right string as straightforward as possible.
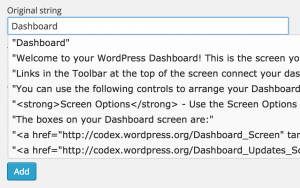
Screenshot 2015-04-19 21.25.30Simply turn on the feature, browse to the page containing the strings you want to change, then head back to add your translation – the original string field will autocomplete captured suggestions, and fill in all of the relevant information when you select a string to change.

Check out our video walkthrough below, or read through the transcript below:

I’m going to talk to you today about changing text on your WordPress site. Obviously – we’re not talking about content you edit yourself – posts, pages etc. but the text, and content that is provided by plugins, or your theme.

We’re going to be looking at the Say What Pro plugin,  let’s get started!

We’re going to walk through how to use the String Discovery feature in the Say What? Pro plugin to change some of the text that is generated by WooCommerce to customise the user experience a little bit. Let’s start with the “Add to Cart” link on our product pages – maybe we want to change that to something else.

We’re logged into WordPress already – so let’s go and take a look at the Say What? Pro plugin. The plugin sits under Tools » Text Changes. You can see here that we don’t have any replacements set up already – let’s try and add one. Now, in order to do its job – the plugin needs to know a few things about the string you’re trying to replace. It needs to know:

  • the exact string as it appears in the plugin, or theme.
  •  the text domain – a unique identifier which says which plugin or theme generated the string
  • additional “context”, so where a string is used to mean two different things in different places
  • And finally, we get to put in our replacement – what we want to change the text to

Now – if you’re happy checking through plugin, or theme code, you can normally find the information you need for these pretty quickly. If that’s the case, then you can use the free version of the plugin – Say What?  It will let you set up string replacements putting this information in manually and can work really well – particularly if you only have a few strings to change, and / or you’re happy hunting through code. If you’re not a code-person – or you have a lot of changes to make though, that can get pretty time consuming.

The main reason for this video though is to look at the String Discovery feature offered by the Pro plugin, that can make setting up replacements a whole lot easier. We can see there’s a tab for this on the settings page – let’s take a look.

There’s some explanatory text on the page, but the summary is that you can:

  • turn on the feature
  • visit the parts of the site you want to change
  • have the plugin capture all the potential string changes on those pages
  • make the process of setting up a replacement as simple as picking from an autocomplete list

We’ll try it out – remember we want to change the Add To Cart button text in WooCommerce. We enable the feature, then – we’ll go back to our product page. We’ll reload that page so that the plugin can capture the strings.

If you’ve got a few changes to make, on different pages, you can go and visit them all now – there’s no need to do one page at a time, you can capture all the strings you need in one go. For this demo we’re just doing strings on this one page. We’ll head back to the Say What admin page and say that we want to add a new string.

Now – this page looks the same as it did before – there’s no real change. The plugin still needs all of this information to set up a replacement. However, now that we’ve captured some strings when we start typing in the original string box we’ll start seeing some autocomplete suggestions. Let’s see what happens when we start setting up our Add to Cart button change.

We’ll start typing in the Original String entry field, and we’ll get some autocomplete suggestions of strings that were used in the pages we visited. We can see the Add to cart text is there as an option. If we pick that, then it will fill in the original string, and the text domain. If there was a context attached to that string, then that would get filled in as well.

We didn’t have to dig around in code to find those, we didn’t have to worry about whether we’ve typed them in correctly, the plugin takes care of that for us. All we have to do is pick the autocomplete item, then set our replacement text at the bottom.

We’ll save that, and we can see it gets added to the list of replacements. If we decide we want to change that overridden text then we can just edit that item at any time and change the replacement text. Let’s see how that looks on the front end of the site.

So, this was our Add to Cart button, we’ll reload the page, and we can see that Add to Cart has been changed, and replaced with our new string. Easy!

Let’s take one more quick example, on this same page – we’ll change the Search Products… text up in the search box here. This is a good example, as the replacement needs a text domain, a context, and the original text is probably a bit different from what you might expect.

So – we’ll head back to the Say What admin pages, add a new string, and start typing. We can see that there’s a few suggestions for “Search Products”. This is a great example of where the String Discovery feature can be really useful. We might have guessed the text domain as WooCommerce, and we might have taken a guess at the original string begin Search Products followed by three dots. Of course that wouldn’t have worked as we would have missed the context, and the fact that the ellipsis is the proper HTML character, not just three individual full stops.

If we pick the autocompletion though all of that comes through, and we can just enter our alternative text, and save.

Looking at the product page again, we can see that the text has changed.

So – that’s us all done for today.


Exporting payments

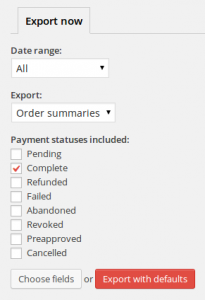
Exporting details of your customer’s orders is easy with the EDD Payment export and reports plugin. First – navigate to the exports screen at Downloads » Export payments. Here you can choose exactly which orders to export, and what information to include for each order.

Export screen

To perform a standard export – you can just choose “Export with defaults” and all of your orders will be exported at summary level, including the most common fields. Alternatively specify how you want your export produced using the various options on the export page.

Date range

You can choose to export all payments, or the date rangs that you’re interested in – you’ll automatically get options that cover your store order range.

What to export

There are two main export types – Order Summaries and Order Lines.

Order Summaries

You can export order-level detail such as order date, order total, order ID, and customer data such as name, email address etc. You’ll get a single line in the export file for each order.

Order Lines

Order line exports give you more detail about the individual order lines. You’ll get a single line in the export file for each order line. You can still include order-level information, but you can also select line level information such as product name, quantity, and item prices.

Payment statuses

You can choose which payments to include – useful if you want to export successful orders only (the default), or payments in a particular status. You can choose from any of the standard statuses.

Selecting export fields

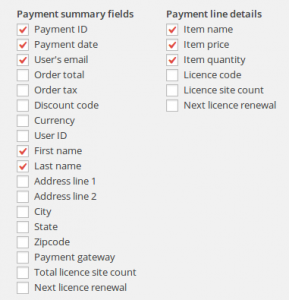
Export field listAs well as choosing the export type, you can also have fine-grained control over precisely which fields are exported.

To choose individual fields to include, or exclude just click on the Choose fields button, and you’ll be given a list of all supported fields, all of which you can select, or de-select before running your import.

The fields are divided into two lists according to whether they’re available on summary exports, or line level exports.

Shipping prices based on number of items purchased

This article shows how you can use the WooCommerce Pro Shipping plugin to set up shipping prices that calculate the price based on the number of items purchased. This is particularly useful if for example you have a standard shipping price, but want to offer a discounted, or free option for customers who purchase multiple items.

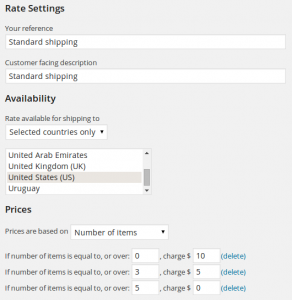
In this example we’re going to set up a set of rules where the standard shipping price is $10, but customers will get reduced shipping of $5 if they buy 3 or more items, and free shipping if they buy 5 or more items.

First, make sure that you’ve installed, and activated WooCommerce Pro Shipping – see the installation guide for information. Once it’s activated, head to WooCommerce » Pro Shipping, and choose Add Rate. This will present you with the add rate form.

items-rateWe’re setting up our rate as “Standard shipping” and we’re using that as both the internal rate (which the store admin’s will see), and the external description that is shown to customers.

In our example we’re restricting this rate to orders that are being delivered to the USA only – so we’ve picked “Selected countries only”, and chosen “United States” only. This rate won’t be offered to customers who choose a non-USA delivery address.

Our rate is based on the number of items purchased, so we choose that, and then set up the three bands we want.

Now – customers will automatically be offered the correct price according to the number of items in their order.

Shipping prices based on order value

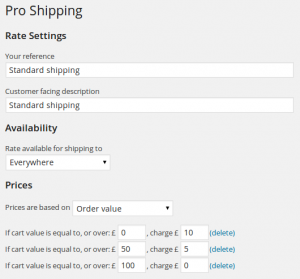
WooCommerce Pro Shipping makes it easy to set up your WooCommerce store with shipping prices that vary according to value of the customer’s order. In our example below we’ll be setting up a simple set of shipping rules that charge £10 for orders up to £50, £5 for orders up to £100, and free shipping for orders over £100.

First, make sure that you’ve installed, and activated WooCommerce Pro Shipping – see the installation guide for information. Once it’s activated, head to WooCommerce » Pro Shipping, and choose Add Rate. This will present you with the add rate form.

We’re going to set up our shipping rate. We’re calling it “Standard shipping” both internally and in the customer facing description. Our rate applies irrespective of the shipping destination – so we’ll leave that set to “Everywhere”.

We set the rate to be based on “Order value”, and set up three weight layers to reflect the three price points we want to set up.

Then it’s a simple case of setting the cart values and shipping prices, each layer is configured by specifying the lowest value that that line applies to.

Here’s our final setup:

order-value-rate


Of course, WooCommerce Pro Shipping allows you to set up multiple rates, and will automatically show all that apply. So if you want to add an Express option, with different value thresholds and prices, just add it as an additional rate, and customers will be presented with the choice during checkout. You can even set up different rates to apply only to specific countries by changing the Availability setting.

Destination & weight shipping in WooCommerce

The WooCommerce Pro Shipping lets you set up multiple shipping rates, and choose the destinations that those rates are valid for. This enables you to set up country or state-specific shipping rates calculated by any of the methods that the plugin supports.

In this example we’re going to focus on weight-based shipping, setting up two weight based rates for the UK (“Standard delivery” and “Next-day delivery”), and another for the rest of the world. This article assumes you have WooCommerce, and the WooCommerce Pro Shipping plugin already installed and activated.

Setting up a rate for UK only

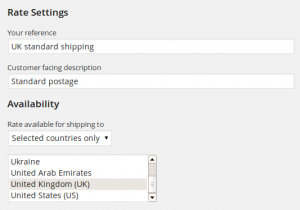
country-specific-shippingThe WooCommerce Pro Shipping plugin is configured under WooCommerce » Pro Shipping. Simply click on the Add Rate button, and you’ll be presented with the add rate screen.

This screen lets you set an internal description for the rate, as well as the customer-facing description. It also lets you set the availability of the rate which will be based on the customers chosen shipping destination, and set the pricing structure and prices. In this screenshot we’re setting up our first rate. Notice that we’re calling it “UK Standard Shipping” internally, but the description that customers will see is simply “Standard shipping”.

We’ve set the availability to “Selected countries only”, and chosen the UK as the only valid country. You can select multiple valid countries here if you need to.

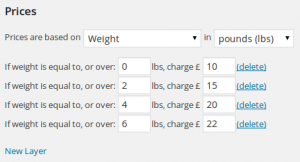
weight-settingsOnce we’ve set the availability it’s time to determine the prices of our shipping. We’ve chosen “Weight” as the basis of our calculation, and specified that we want to set up our pricing rules in pounds (lbs). You can choose any measurement here, no matter what units you use on your products – the plugin will convert the weights automatically.

Then you can set up as many layers as you like – specifying the starting weight for each price, and the charge amount. If you need more layers, just use the “New layer” link.

Once you’ve entered the weight limits, and prices, just click “Add rate” and your rate will be saved.

Adding a second UK rate

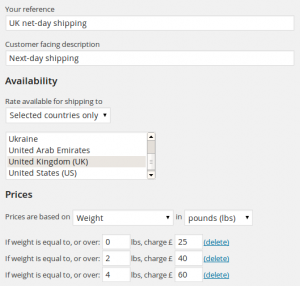
weight-settings-2Next, we add our second UK rate. The availability settings remain the same (selected countries only), and again we’re calculating based on the weight of the cart with the bands specified in pounds (lbs).

Here we’ve only set up three tiers –  the weight bands for this rate don’t have to match those in our other rate – so you’re free to make them match the specific postage method you’re using for that rate.

Our prices are also different – as you’d expect.

The screenshot below shows what customers will see at checkout if they choose the UK as their shipping destination.

uk-shipping-at-checkout

Adding our “rest of the world” rate.

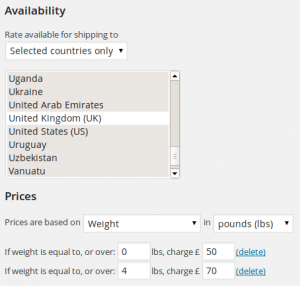
row-shippingThe final rate we’re going to show is a “rest of the world” rate. To set this up, we follow the same steps, but instead of choosing “United Kingdom” we leave all countries selected, and de-select the UK. This makes the rate valid for all countries apart from the UK.

WooCommerce will check this during checkout, and the customer will only be offered the rates that apply to their chosen shipping destination.

Once this rate will be added, then any customers choosing a non-UK shipping destination will receive this rate automatically. As we’ve only set up one international rate then they won’t get a choice of rates – although you are of course free to set up as many rates as you wish for different countries.

International shipping at checkout

International shipping at checkout


Tracking MailChimp opt-ins

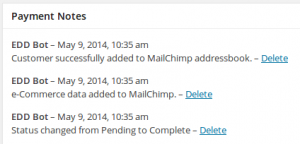
The Easy Digital Downloads MailChimp plugin keeps track of which of your customers have opted in and been sent to MailChimp. The information is recorded against the payment in the Payment notes section.

edd-mc-added


It will show if customers already exist on the list, and whether e-Commerce data was successfully sent.

Category specific price filtering

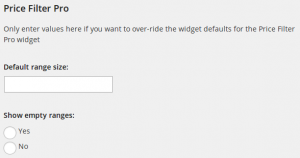
The WooCommerce Price Filter Pro widget has a default price range. Sometimes though you will want to use different range sizes for different categories, for example if you have some more-expensive products you probably want a large range size just for that category.

category-price-filter-settingsThis is supported by the plugin, simply edit the store category (WooCommerce » Categories) and you’ll see options to set the category size and whether or not empty ranges are shown when the widget is displayed in that category.


Flat rate shipping per country

WooCommerce Pro Shipping settings linkThis article shows how to use the WooCommerce Pro Shipping plugin to set up multiple flat rate shipping rules, each of which only applies to specific countries. This article assumes you have WooCommerce, and the WooCommerce Pro Shipping plugin already installed and activated.

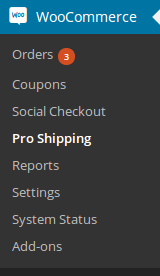
First – head over to the Pro Shipping settings – you’ll find them under the main WooCommerce menu.

Click on the Pro Shipping link, and you’ll be able to configure the plugin, and set up the rates that you want.

In this example, we’re going to set up three rates. Each rate will only be available to a specific country, or countries, and will be based on a flat price:

  1. UK only shipping – £5
  2. Shipping to France – £10
  3. Non-UK shipping – £15

Set up your first rate – UK Flat Rate £5

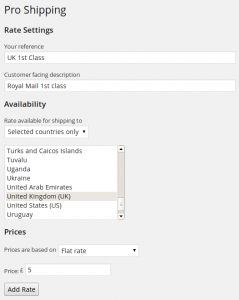
Pro Shipping Flat Rate SettingsSimply click on the “Add Rate” button, and you’ll be presented with the add rate screen. This screen lets you set an internal description for the rate, the customer-facing description. It also lets you set the availability of the rate, based on the customers chosen shipping destination, and set the pricing structure and prices.
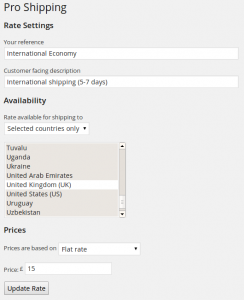
We’re setting an internal reference to the rate – “UK 1st Class” – this is only shown in the admin area. We’re also choosing the customer-facing description – “Royal Mail 1st class”.

We’ve set the availability of the rate to “Selected countries only” and chosen just the United Kingdom. This means that the rate will only ever be shown to customers who have selected the UK as their shipping destination.

We’ve then set the rate to be calculated as a flat rate of £5.

Setting up a second rate – International flat rate £15

pro-shipping-3For our second rate we’ve left all the countries selected, and just unselected the UK. This means that the rate will be shown for any country apart from the UK.

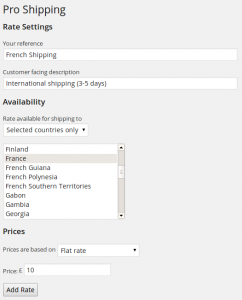
Setting up a third rate – France only £10

pro-shipping-4Our third rate is fairly similar to our first – it’s a single country rate, set at £10, and available in France only.

Testing the rates

Now that we’ve set up our rates we can see how they appear on the front-end. Once people have chosen their shipping destination then the correct rates will be displayed.

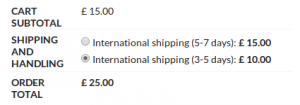
pro-shipping-6So, for a customer requesting delivery to France they will be given two options, the International rate, and the France rate. Note that the customer doesn’t see these internal labels – they simply see the customer facing description.

pro-shipping-7A customer selecting Belgium, or another, non-UK, non-France country, will receive solely the International rate – again they’ll see the customer facing description:
 

Scheduling Google Merchant Centre feed

Once you’ve successfully tested your feed you will probably want to set up your Merchant Centre account to automatically fetch your feed periodically.

Log into your merchant centre, and head to Data Feeds. Against your active feed, choose the Create Schedule option. You’ll be asked how frequently you want Google to pull your feed, and the URL to your feed. You can find this on the settings page (Downloads » Settings » Product Feeds)

Once you’ve entered this information, choose Schedule and Fetch now. Google will check that they can download your file and automatic refreshes will be scheduled according to the frequency you selected.

Testing Google Merchant Centre feed

In order for your products to be listed in Google Product Search, you must create a Google Merchant Centre account for yourself, and then tell Google where it can find product information.

Step 1 – Sign in to Google Merchant Centre

Head to your Google Merchant Centre account – if you don’t already have an account you can sign up here.

Step 2 – Create a data feed

The first thing to do is set up a test data feed. This will allow you to upload your feed, and check that you’ve provided all required information with affecting your live account.

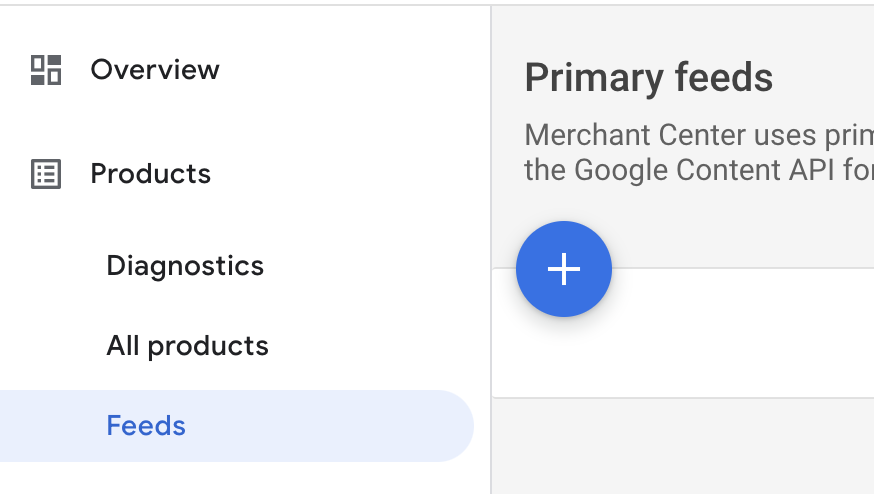
Go to your Merchant Centre Dashboard and click on Products » Feeds, and then on the large + icon in the Primary Feeds section.

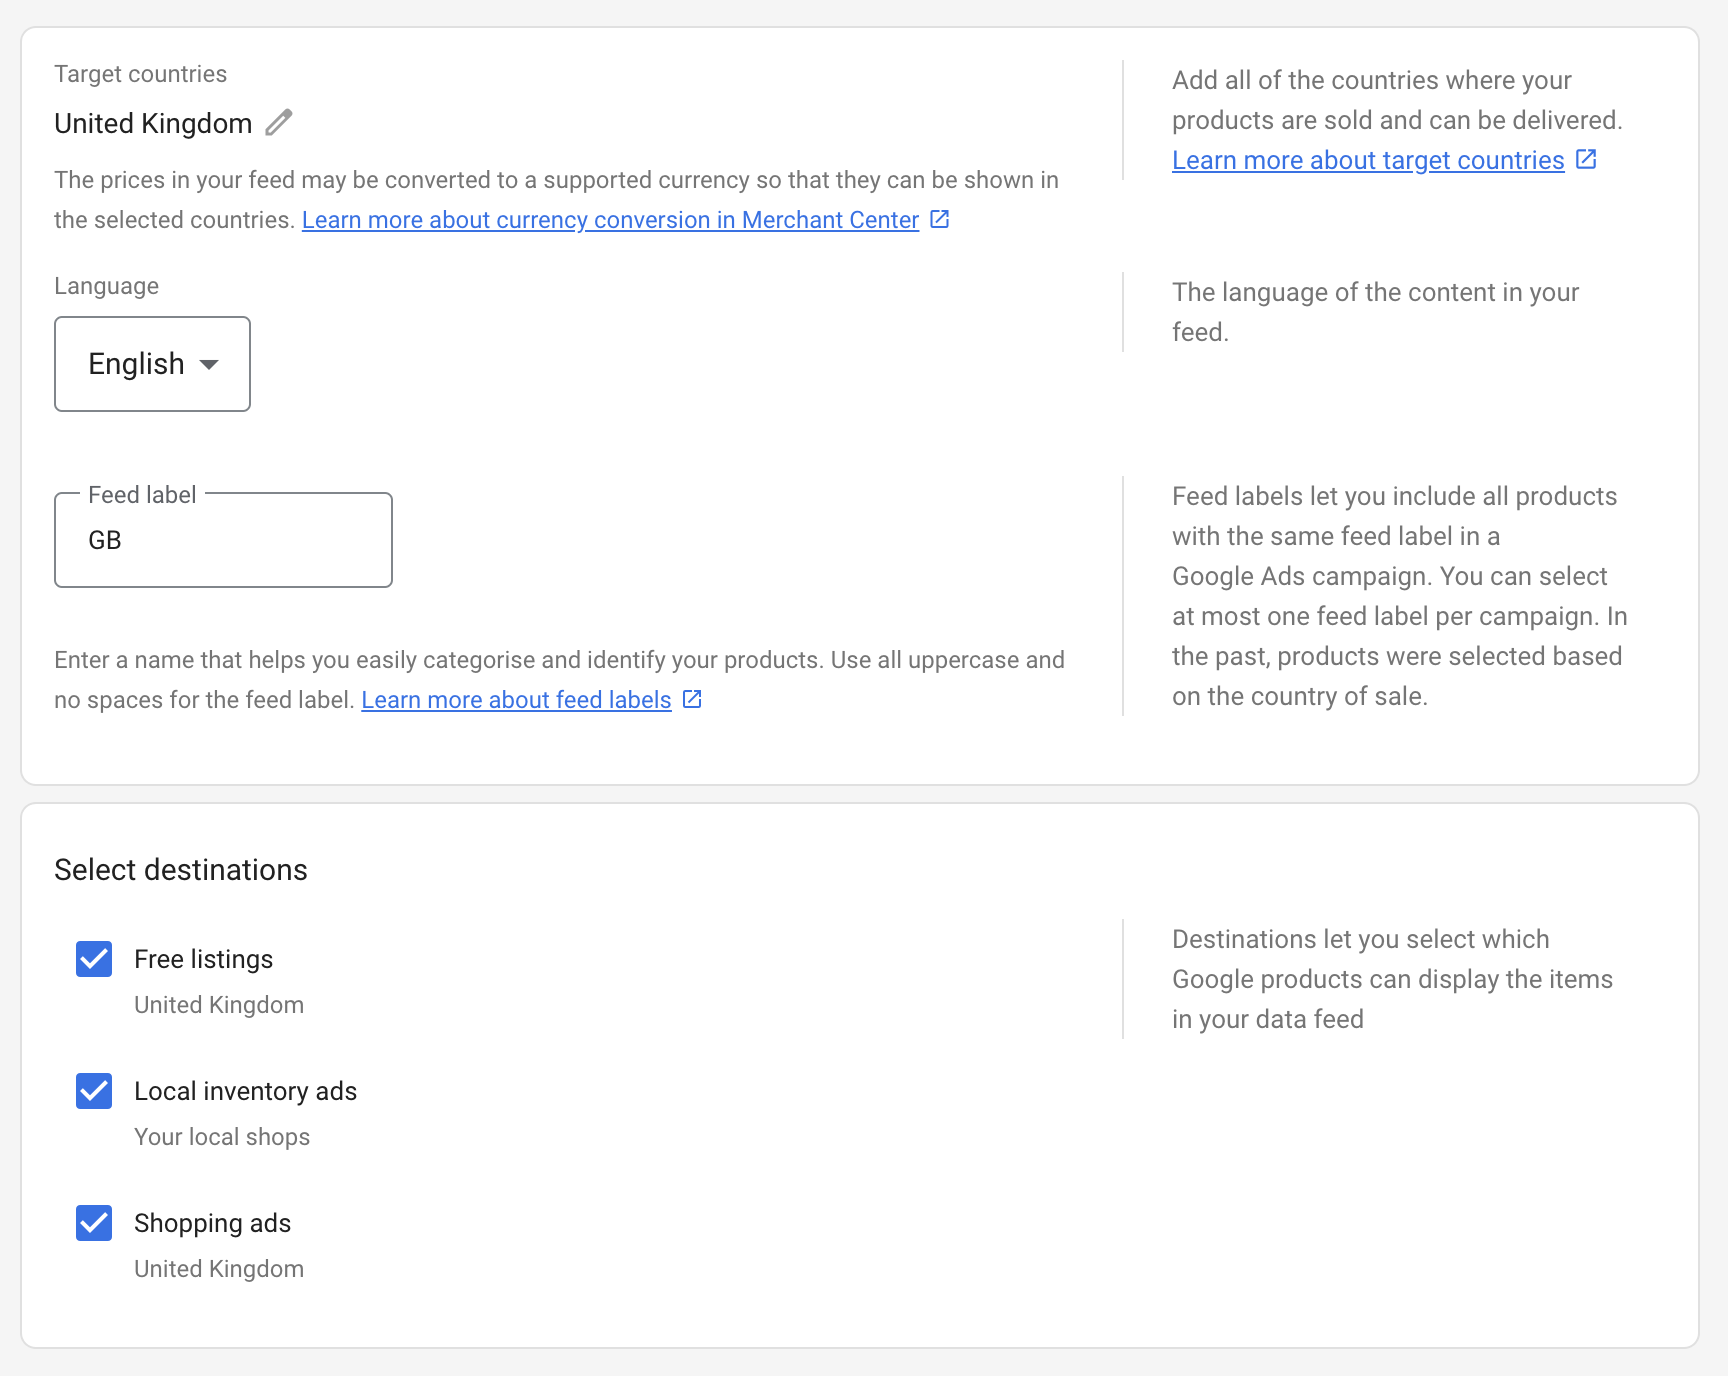
You’ll be asked to confirm the target country for your feed, language, and which programmes you are submitting the feed for.

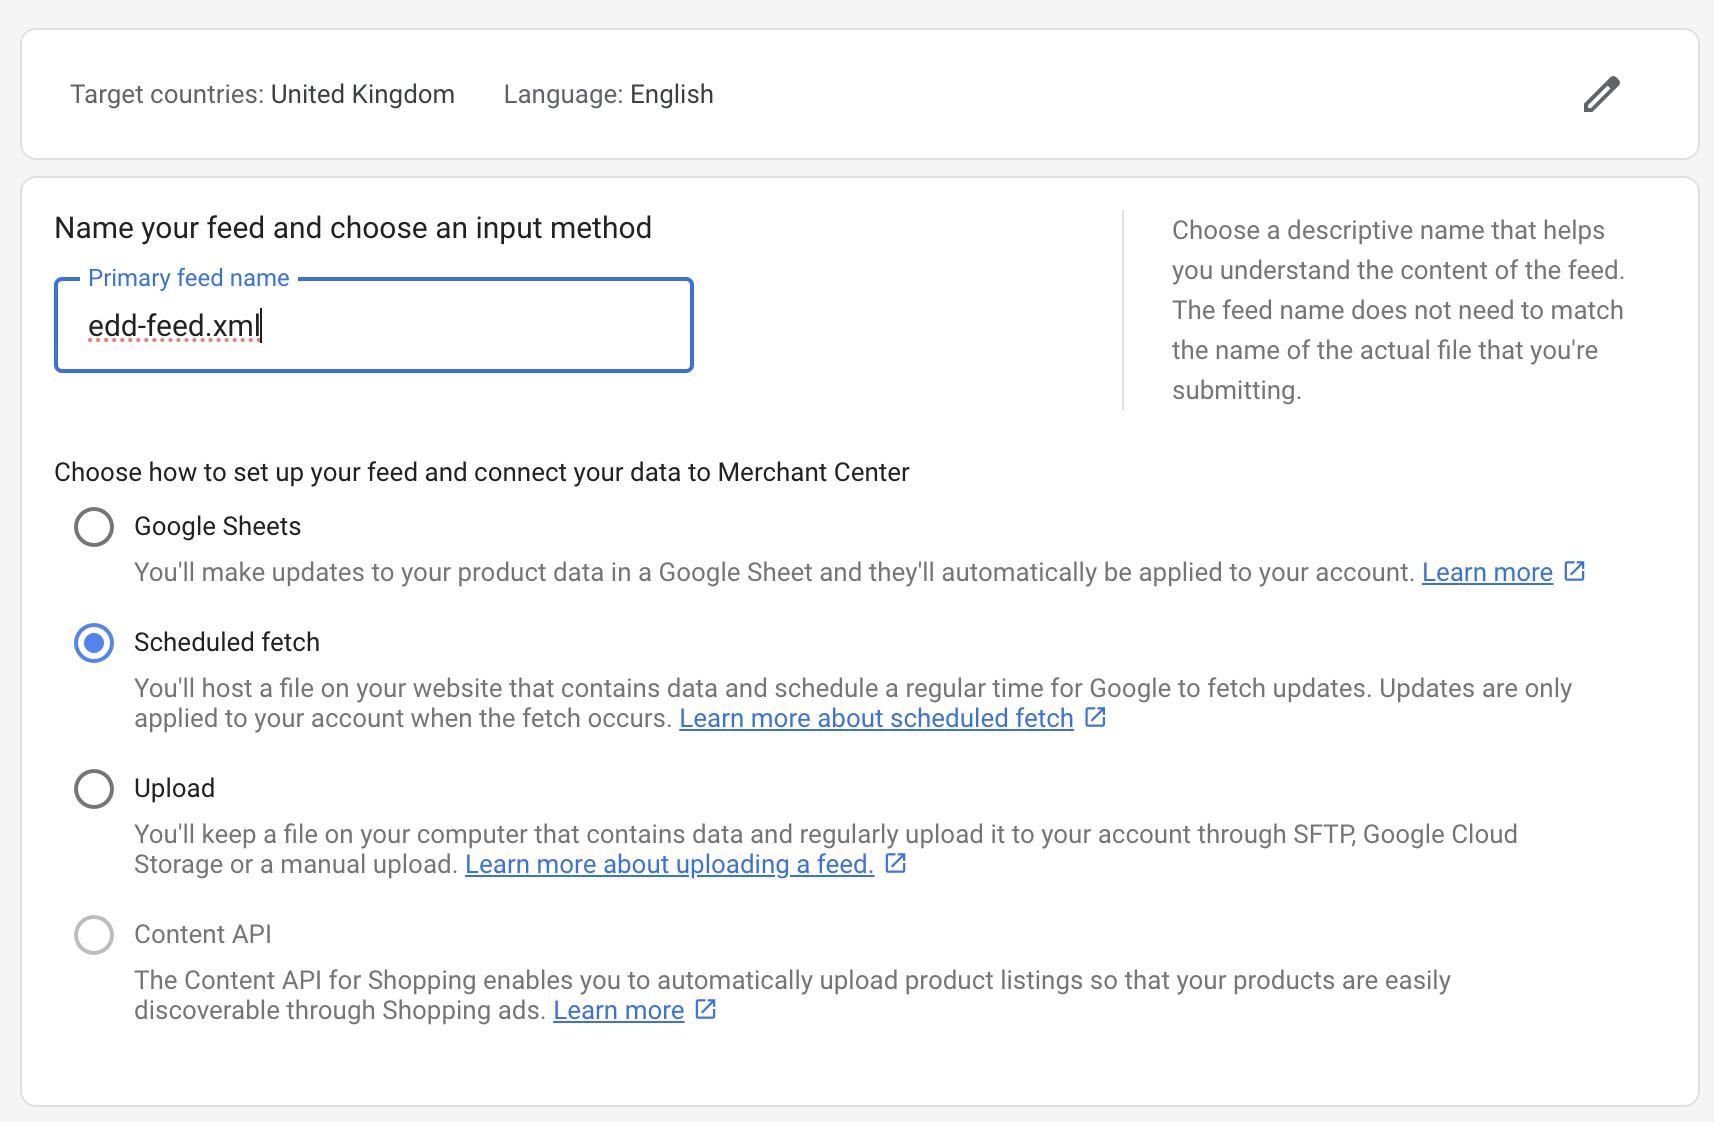
Next, you’ll be asked to enter a feed name. The actual name you choose isn’t important – you can just enter “edd-feed.xml”. You’ll also be asked how you’re connecting your feed to Google Merchant Centre, choose “Scheduled Fetch“:

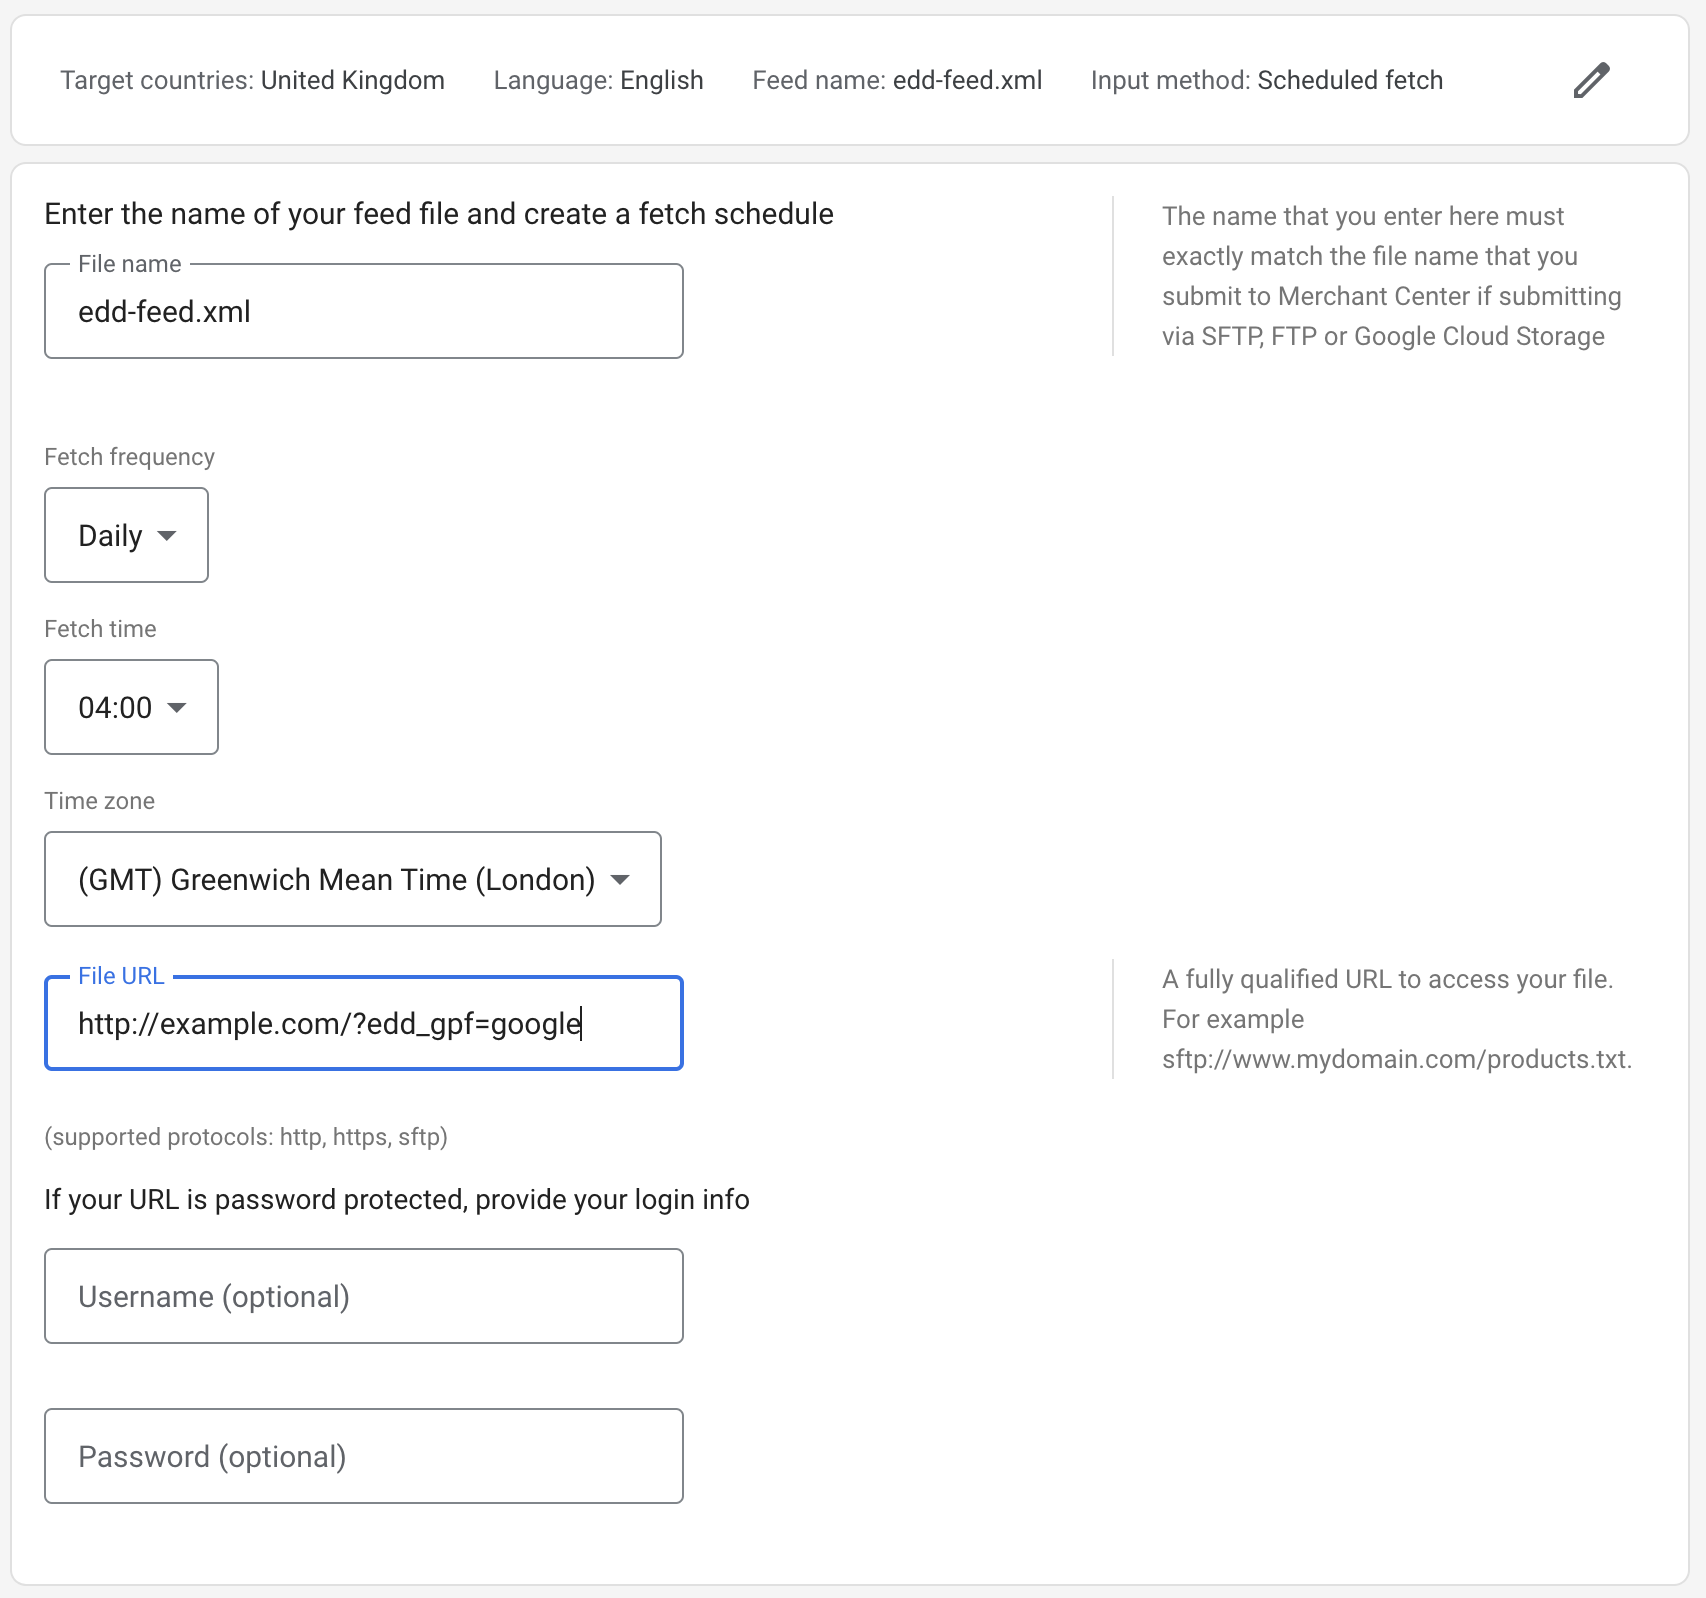
In the final step, you’ll enter your feed name again (edd-feed.xml), when you want the feed fetched (we suggest daily, in the early hours of the morning), and the feed URL. To get your feed URL go to the main EDD settings page, and choose the Product Feeds tab. Here you’ll find the URL of your Google feed. Enter that in the “File URL” box in the Google Merchant Centre setup screen. 


Disabling double opt-in

When subscribers are sent to MailChimp, they’re flagged as requiring double opt-in before their details are added to your list. This means that the subscriber receives an email asking them to confirm their subscription.

If you’re happy that you’ve already clearly explained that users will be added to your mailing list, and that this step is unnecessary, the plugin includes a filter that turns this flag off when adding users.

Note: Abusing this will likely end you in hot water with Mailchimp – be aware! 🙂

To disable the setting, just add the following code to your theme’s functions.php file – or a site specific plugin.

function my_disable_double_optin($optin) {
    return false;
}
add_filter( 'smci_double_optin', 'my_disable_double_optin' );

Making “order fields” available on order-line exports

The WP e-Commerce dashboard plugin features a flexible sales export that allows you to export either summary order information, or detailed line-item exports.

The information available on these exports is tailored to the type of information being exported. For example the order export doesn’t allow you to include SKU, or item price detail since there would be multiple values per order. Likewise, out-of-the box, the detail level export doesn’t let you include summary information since the fields would be repeated for each order line.

Sometimes though, you may want to repeat order-level information on the order lines. A good example is order notes which might be used by delivery staff, and the duplication doesn’t matter compared to the convenience of having item, and delivery notes together. Fortunately it’s easy to change which extract types fields are available on by  attaching to the filter ses-wpscd-csv-fields-available. Here’s an example making the “order notes” field available on line level exports, as well as summary exports.

function change_order_note_export_field($fields) {
    $fields['order-notes']['ShowOn'] = 'Both';
    return $fields;
}
add_filter('ses-wpscd-csv-fields-available', 'change_order_note_export_field', 10, 2);

Simply add that code to your theme’s functions.php file, or a site-specific plugin.

Setting a custom filename for scheduled exports

By default scheduled CSV exports have an autogenerated name, but occasionally you may need to control this name, or have it generated according specific logic. There are filters available that allow you to override the default filename of the generated file. The example below shows how to override the filename such that the file is always called “custom_filename.csv” – of course you can carry out any logic you like to decide on the filename – just make sure that you return a full path, not just the filename.

function ses_wpscd_scheduled_export_filename ( $filename ) {

    // Split the full path into the individual folders / filename
    $split_filename = explode( '/', $filename );

    // Drop the current filename
    array_pop( $split_filename );

    // Add the filename we want
    $split_filename[] = 'custom_filename.csv';

    // Merge the array back into a string again
    $new_filename = implode( '/', $split_filename );

    return $new_filename;
}
add_filter( 'ses_wpscd_scheduled_export_filename', 'ses_wpscd_scheduled_export_filename' );

WooCommerce shipping by UK countries or counties

The WooCommerce Pro Shipping extension lets you configure rates specific to countries, or states easily, having multiple different rates for different shipping destinations, and controlling things so that the right rates get shown to the right customers at checkout.

However the list of countries and states comes from the core WooCommerce product. While this has a pretty solid list of countries, there are some occasions where it doesn’t do quite what you want. One of these is my home country – the UK. WooCommerce treats this as one country which is often just fine. Sometimes however people want to offer different rates for the different countries that make up the UK (England, Scotland, Wales and Northern Ireland), or rates to specific counties.

Fortunately, WooCommerce allows the list of countries and states to be filtered and added to. The “WooCommerce UK Counties” plugin  extends the list to include all of the counties of the UK countries allowing you to be pretty specific about the rates you set up. Check it out on GitHub.