String discovery

Screenshot 2015-04-19 21.19.32
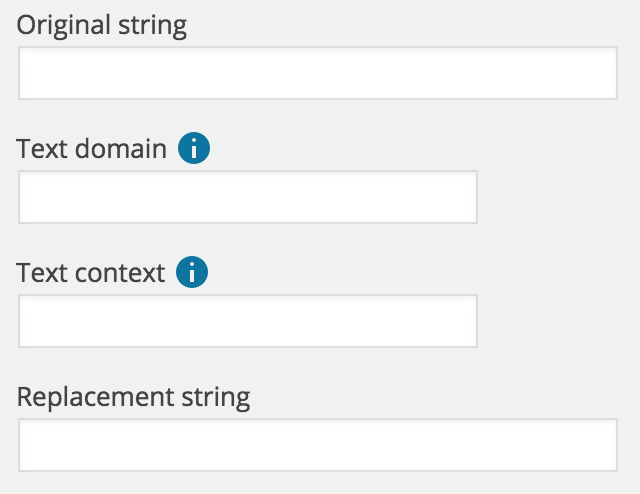
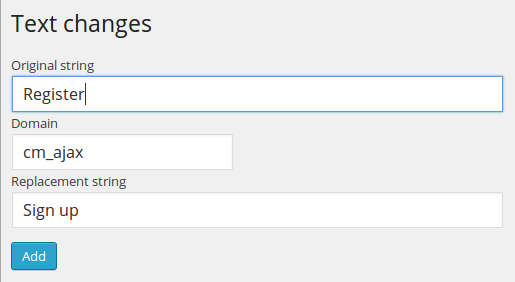
When setting up string replacements with the Say What? plugin, you’re asked to provide a number of different bits of information, the original string, the context, the text “domain” and the replacement you want to use.

Finding out the right information to enter into these fields can be straightforward if you’re lucky. However, if you’re dealing with complex plugins that feature variable substitution, or complex string replacements, finding the right information can involve delving through code.

The Say What? Pro plugin includes a “String Discovery” feature that’s designed to make the process of finding the right string as straightforward as possible.

Screenshot 2015-04-19 21.25.30
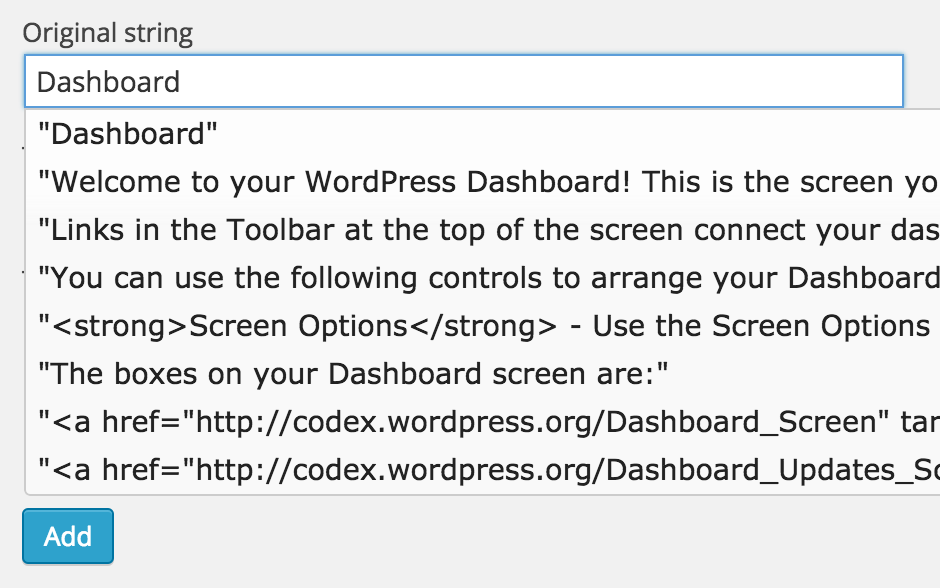
Simply turn on the feature, browse to the page containing the strings you want to change, then head back to add your translation – the original string field will autocomplete captured suggestions, and fill in all of the relevant information when you select a string to change.

Check out our video walkthrough below, or read through the transcript below:

I’m going to talk to you today about changing text on your WordPress site. Obviously – we’re not talking about content you edit yourself – posts, pages etc. but the text, and content that is provided by plugins, or your theme.

We’re going to be looking at the Say What Pro plugin,  let’s get started!

We’re going to walk through how to use the String Discovery feature in the Say What? Pro plugin to change some of the text that is generated by WooCommerce to customise the user experience a little bit. Let’s start with the “Add to Cart” link on our product pages – maybe we want to change that to something else.

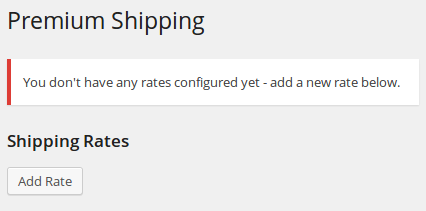
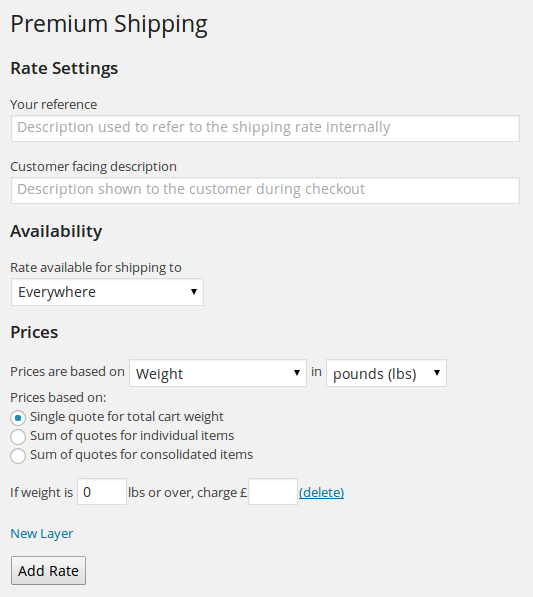
We’re logged into WordPress already – so let’s go and take a look at the Say What? Pro plugin. The plugin sits under Tools » Text Changes. You can see here that we don’t have any replacements set up already – let’s try and add one. Now, in order to do its job – the plugin needs to know a few things about the string you’re trying to replace. It needs to know:

  • the exact string as it appears in the plugin, or theme.
  •  the text domain – a unique identifier which says which plugin or theme generated the string
  • additional “context”, so where a string is used to mean two different things in different places
  • And finally, we get to put in our replacement – what we want to change the text to

Now – if you’re happy checking through plugin, or theme code, you can normally find the information you need for these pretty quickly. If that’s the case, then you can use the free version of the plugin – Say What?  It will let you set up string replacements putting this information in manually and can work really well – particularly if you only have a few strings to change, and / or you’re happy hunting through code. If you’re not a code-person – or you have a lot of changes to make though, that can get pretty time consuming.

The main reason for this video though is to look at the String Discovery feature offered by the Pro plugin, that can make setting up replacements a whole lot easier. We can see there’s a tab for this on the settings page – let’s take a look.

There’s some explanatory text on the page, but the summary is that you can:

  • turn on the feature
  • visit the parts of the site you want to change
  • have the plugin capture all the potential string changes on those pages
  • make the process of setting up a replacement as simple as picking from an autocomplete list

We’ll try it out – remember we want to change the Add To Cart button text in WooCommerce. We enable the feature, then – we’ll go back to our product page. We’ll reload that page so that the plugin can capture the strings.

If you’ve got a few changes to make, on different pages, you can go and visit them all now – there’s no need to do one page at a time, you can capture all the strings you need in one go. For this demo we’re just doing strings on this one page. We’ll head back to the Say What admin page and say that we want to add a new string.

Now – this page looks the same as it did before – there’s no real change. The plugin still needs all of this information to set up a replacement. However, now that we’ve captured some strings when we start typing in the original string box we’ll start seeing some autocomplete suggestions. Let’s see what happens when we start setting up our Add to Cart button change.

We’ll start typing in the Original String entry field, and we’ll get some autocomplete suggestions of strings that were used in the pages we visited. We can see the Add to cart text is there as an option. If we pick that, then it will fill in the original string, and the text domain. If there was a context attached to that string, then that would get filled in as well.

We didn’t have to dig around in code to find those, we didn’t have to worry about whether we’ve typed them in correctly, the plugin takes care of that for us. All we have to do is pick the autocomplete item, then set our replacement text at the bottom.

We’ll save that, and we can see it gets added to the list of replacements. If we decide we want to change that overridden text then we can just edit that item at any time and change the replacement text. Let’s see how that looks on the front end of the site.

So, this was our Add to Cart button, we’ll reload the page, and we can see that Add to Cart has been changed, and replaced with our new string. Easy!

Let’s take one more quick example, on this same page – we’ll change the Search Products… text up in the search box here. This is a good example, as the replacement needs a text domain, a context, and the original text is probably a bit different from what you might expect.

So – we’ll head back to the Say What admin pages, add a new string, and start typing. We can see that there’s a few suggestions for “Search Products”. This is a great example of where the String Discovery feature can be really useful. We might have guessed the text domain as WooCommerce, and we might have taken a guess at the original string begin Search Products followed by three dots. Of course that wouldn’t have worked as we would have missed the context, and the fact that the ellipsis is the proper HTML character, not just three individual full stops.

If we pick the autocompletion though all of that comes through, and we can just enter our alternative text, and save.

Looking at the product page again, we can see that the text has changed.

So – that’s us all done for today.


Setting up the plugin

Step 1 – Install & activate the plugin

Install & activate the plugin as you would any normal plugin. If in doubt – check out the the plugin installation article in the WordPress Codex.

Step 2 – Choose dashboard reports

Out of the box, the plugin will add the following widgets to your WordPress dashboard:

Store Revenue

Store revenue report

The store revenue report gives you an at-a-glance view of your store sales’ worth over the past four weeks. The graph will automatically scale with your sales, and allows you to see how your sales are performing against past weeks. Hover over individual points to see the exact figures.

Store Sales

Store sales report
The store sales report gives you a simple view of your sales volume over the past four weeks. The graph will automatically scale with the number of sales you make. The graph allows you to see how your sales are performing against past weeks. Hover over individual points to see the exact figures.

Top products

Download salesThe download sales list shows you the top performing products in your store all-time. Easily see which of your products sell the most.


Step 3 – Choose dashboard widgets

You can choose which widgets you want displayed by using the Screen Options link in the top right of your WordPress dashboard. Simply enable or disable the widgets as you would any other dashboard widgets. You can also drag the widgets around to different positions on your dashboard as you would any normal WordPress dashboard widget.

Step 4 – Access exports

When you’re ready to export payments, visit Downloads » Export  payments to get started. You can choose the date range, payment status, whether to export summary information, or detailed line-level information, and even choose specific fields to include/exclude. Check out our article on exporting payments for more information.

Adding a string replacement

Adding a string replacement to your site is simple once you’ve got the plugin set up and installed.

Step 1 – Install & activate the plugin

Install & activate the plugin as you would any normal plugin. If in doubt – check out the the plugin installation article in the WordPress Codex.

Step 2 – Find out the string to change

You can use the plugin to change strings in either WordPress core, or plugins you have on your site. The only requirements is that the plugin must have correctly marked their strings for translation. Translated strings are generally wrapped in __(), _e(), or _x(), for example:

$foo = __('This is a translatable string', 'plugin-domain');

In many cases, finding out the original string is straightforward. For example if you want to change a button that says “Register” to “Get involved”, then the chances are that the original string will just be “Register”. Sometimes though the string may be more complex, and you may have to browse the source code of the plugin to confirm the exact string – the plugin can’t match partial strings.

As well as knowing the original string, you also need to know the plugin “text domain”. This is the second argument to the translation function – in our example above it would be plugin-domain.  The text domain is an identifier for which plugin or module of WordPress the string resides in. Although the terms are similar, this is not related to the domain name of your website (e.g. http://www.example.com).

default-formAs a worked example, we’re going to make a change to the forms created by the Campaign Monitor Ajax Forms plugin. By default, the form includes a submit button that reads “Register”. It’s a pretty safe guess that this is the string we need – but we also need to know the textdomain. Taking a look in the plugin source, we can see that the button is output using the following code:

_e('Register', 'cm_ajax');

This confirms that “Register” is the correct string, and also gives us the text domain – “cm_ajax”. Now that we have these, we can go ahead and set up our replacement.

Step 3 – Setup the string replacement

In your WordPress admin panel – you can now go to the Say What plugin settings page – you can find it under Tools » Text Changes. You’ll be presented with a list of your current replacements, as well as a link to add a new item. Clicking this will show the replacement form, we can fill it in with the original string, text domain, and our desired replacement string:

replacement

We save the replacement, and check the form on the front end and our change is successfully displayed:

replaced

Setting up WP e-Commerce Premium Shipping

Activating the Premium Shipping plugin on your site is straightforward.

Step 1 – Install & activate the plugin

Install & activate the plugin as you would any normal plugin. If in doubt – check out the the plugin installation article in the WordPress Codex.

Step 2 – Set up your shipping options

Now that the plugin has been activated you can start setting up your shipping options. WP e-Commerce won’t start offering Premium Shipping quotes until we’ve enabled it within our store settings, so you can set up your rates in advance, and then enable thee module in WP e-Commerce to put your rates live.

wpec-shipping-no-ratesRight now though, we need to set up the rates we want. You can find the Premium Shipping settings under Settings » Premium Shipping. Out-of-the-box there won’t be any rates configured, so just go ahead and click Add rate to start setting up your pricing rules.

You can set up multiple different rates, for example if you offer different shipping options to your customers (Standard deliver, next-day delivery etc.), or if you want to have different pricing rules apply to customers depending on their shipping destination.

The “Add Rate” screen will let you choose which shipping destinations the rate is valid for, and how prices for this rate will be calculated.

wpec-add-rate


Step 3 – Enable the plugin in your WP e-Commerce settings

Once you’ve set up your pricing rates, head over to Settings » Store » Shipping. The premium shipping plugin will be one of your listed shipping providers. Tick this and save your settings to put your rates live.

Setting up MailChimp with EDD

Step 1 – Install & activate the plugin

Install & activate the plugin as you would any normal plugin. If in doubt – check out the the plugin installation article in the WordPress Codex.

Step 2 – Grab your MailChimp account details

To set up the plugin, you’ll just need one thing – your API key. It can be found in your MailChimp account online under Account Settings » Extras » API Keys

mailchimp-api-key

Step 3 – Configure the plugin

edd-mc-settingsIn your WordPress admin panel, head over to Downloads » MailChimp integration and you’ll see the plugin configuration screen. This will ask you a couple of things. Firstly choose whether you’re adding all purchasers, or providing an opt-in choice. The latter is always preferred unless you’re handling this choice elsewhere.

If you’re offering a choice then you also get to choose the checkbox title and description that will be shown.

Finally you’ll be asked to enter your API (From Step 2).

Enter your API key and save your settings. The plugin will validate your API key and also retrieve a list of your MailChimp lists. As the final step simply choose which list you would like your customers to be added to.

That’s it – you’re all set. Customers will be added to the list you’ve chosen when they opt in, and the transaction information will be sent through to MailChimp straight after purchase.

Setting up WP e-Commerce Campaign Monitor Integration

Step 1 – Install & activate the plugin

Install & activate the plugin as you would any normal plugin. If in doubt – check out the the plugin installation article in the WordPress Codex.

Step 2 – Grab your Campaign Monitor API details

To set up the plugin you’ll need two API keys from your campaign monitor account – your Account API key, and the list ID for the list that you want to add purchasers to.

Step 3 – [Optionally] Add a confirmation checkbox to your store checkout

The plugin can be set up in two different ways, firstly if you already have your customers “opt-in” being managed in some other way, then you can choose to send every purchaser over to Campaign Monitor. Alternatively, you should add a checkbox to the checkout form to allow customers to opt in – set the “Value” for your checkbox to “Yes” for the opt-in choice:

checkout-field

Step 4 – Configure the plugin

Head over to Settings » Store/CM Integration. Here you can select the checkout field that you just created – the customers response to this will be checked to decided if the customer should be sent or not. You can also enter your API key, and list ID.

cm-settings

That’s all you need to do to get up and running. Once you’ve filled in your API details, you’ll also be able to add custom fields to be sent with the subscriber details.


Setting up WooCommerce Price Filter Pro

It’s easy to get up and running with the WooCommerce Price Filter Pro plugin – just follow the step by step instructions below.

Step 1 – Install & activate the plugin

Install & activate the plugin as you would any normal plugin. If in doubt – check out the the plugin installation article in the WordPress Codex.

Step 2 – Add a widget

pfp-widget-settingsHead to Appearance » Widgets and drag the WooCommerce Price Filter Pro widget to your sidebar of choice.

The widget settings let you set the title of the widget, and the default range size. In our example each range will over £10 ranges, e.g. £0 – £9.99, £10 – £19.99 etc.

Note: This is the default for the widget, but you can override these settings on a per category basis, so for example if you have one category which contains higher, or lower value products you can have the widget adapt accordingly.

You can also choose whether to show empty ranges, if not they will be skipped, and only ranges that include products will be shown.

You’re now up and running. Check out our article on category specific settings for more information.


Activating WooCommerce Pro Shipping

Activating the Pro Shipping plugin is straightforward.

Step 1 – Install & activate the plugin

Install & activate the plugin as you would any normal plugin. If in doubt – check out the the plugin installation article in the WordPress Codex.

Step 2 – Set up your shipping options

Now that the plugin has been activated you can start setting up your shipping options. We don’t want WooCommerce to start trying to use Pro Shipping to generate prices before we’ve configured our rates, so our final step later on will be to enable the module in the WooCommerce settings.

no-ratesRight now though, we need to set up the rates we want. You can find the Pro Shipping settings under WooCommerce » Pro Shipping. Out-of-the-box there won’t be any rates configured, so just go ahead and click Add rate to start setting up your pricing rules.

You can set up multiple different rates, for example if you offer different shipping options to your customers (Standard deliver, next-day delivery etc.), or if you want to have different pricing rules apply to customers depending on their shipping destination.

The “Add Rate” screen will let you choose which shipping destinations the rate is valid for, and how prices for this rate will be calculated.

rate-setup

Step 3 – Enable the plugin in your WooCommerce settings

Once you’ve set up your pricing rates, head over to WooCommerce » Settings » Shipping. Pro shipping will be one of your listed shipping providers. Select this, choose Enable this shipping method and you’re ready to go. 

enable-it

Setting up FreshDesk integration

The Easy Digital Downloads Freshdesk integration is simple to set up. Here’s what you’ll need:

Step 1 – Installation

Install & activate the Easy Digital Downloads / Freshdesk plugin as you would any normal plugin. If in doubt – check out the the plugin installation article in the WordPress Codex.

Step 2 – Generate your unique FreshPlug code

Your unique FreshPlug code is automatically created for you. Simply head over to the plugin settings – you can find them on the main Easy Digital Downloads settings page, under the new “Freshdesk” tab.

To activate the FreshPlug on your account:

  • Log into your Freshdesk account
  • Head to the admin area, and click on Integrations under Helpdesk Productivity.
  • Click on the FreshPlugs tab, and choose New FreshPlug
  • Enter a Name and Description that suit you
  • Copy and paste the code from the plugin settings screen

Step 3 – Test!

Find a ticket from a customer, and you should see their order information pulled through into the Freshdesk sidebar automatically!


Set up your Google Merchant Centre feed

The Easy Digital Downloads Product Feed plugin allows you to quickly set up everything you need to create a Google Merchant Centre feed.

Step 1 – Install & activate the plugin

Install & activate the plugin as you would any normal plugin. If in doubt – check out the the plugin installation article in the WordPress Codex.

Step 2 – Basic configuration

edd-gpf-settings-1
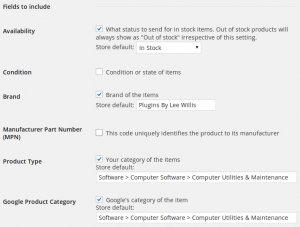
You can find the plugin settings on the main Easy Digital Downloads settings page at Downloads » Settings » Product Feeds.

This page will provide you with background information, links to Google’s feed policies, and the URL for your feed that you’ll need to either download the feed yourself, or to set up scheduled fetching in your Merchant Centre account.

On this page you need to set up the fields that you want to include in your feed. Simply tick the fields that you want to include. If it makes sense you can also set up store-wide defaults for each field – for example if all of your products are the same Brand, or category.

Step 3 – Set category defaults

Sometimes it’s helpful to set defaults according to your store’s category. This normally happens when you’re grouping products by Brand, or Type. If this is the case for your store, simply edit the store category, and you’ll find that any fields you’ve enabled will appear on the category edit screen. You can then provide default values for those fields that will be applied to all products in that category – a lot quicker than adding the information against every product.

Values set here will override store defaults for the products in the category.

Step 4 – Set product values

edd-gpf-settings-2Sometimes you will need to set specific values for individual products (Particularly useful for fields such as Manufacturer Part Number, SKU etc.). You can do this from the main product admin page. Any values you set here will override store defaults, or category defaults.

You can also choose to exclude specific products from the feed using the checkbox on the product edit page if you don’t want to include the products in the feed.

Step 5 – Ready to test

Now that you’ve chosen which fields to include, set defaults, and product information you’re ready to test your feed – see how to test Google Merchant Centre feed for further information.

Setting up Social Checkout for WooCommerce

This short guide will talk you throw setting up the Social Checkout for WooCommerce plugin – choosing the social networks you want your customers to share to, and setting up customised social settings, and messages.

Step 1 – Install & activate the plugin

Install & activate the Social Checkout for WooCommerce plugin as you would any normal plugin. If in doubt – check out the the plugin installation article in the WordPress Codex.

Step 2 – Set up the Social Checkout Plugin

woocommerce-social-checkout-2
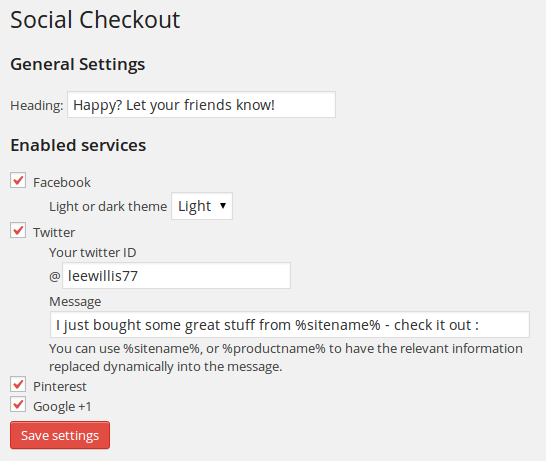
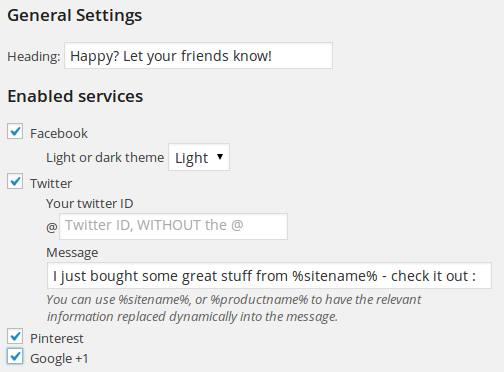
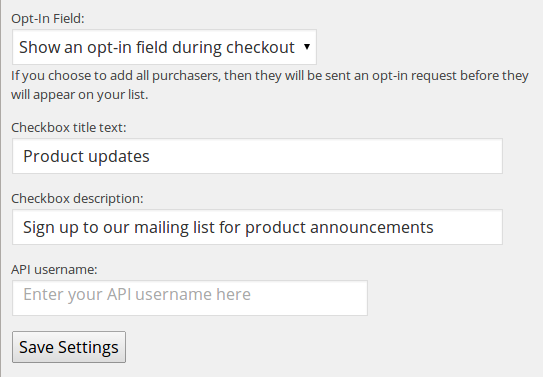
Log into your WordPress admin area, and go to WooCommerce » Social Checkout. You’ll see the Social Checkout for WooCommerce settings screen.

These are the only settings you need to configure – so you’ll soon be up and running.

First – set the heading – this will be used to introduce the social sharing block after checkout.

Once you’ve done that you need to choose which social networks you want to offer. This will depend on your business, and which networks are most popular with your customers.

Step 3 – Set network-specific settings

If you enable a network, you’ll be able to enter settings specific to that network.

Facebook

Choose whether to display the light or dark facebook widget.

Twitter

Enter your business’ Twitter account details. This will be added to the suggested tweet, and customers will also be prompted to follow you after sharing.  You can also choose a default message, including using variables such as %sitename% or %productname%. These will be replaced in real time depending on what the customer ordered, and is choosing to share.

Step 4 – You’re done!

The social sharing buttons will be shown after checkout, and your customers encouraged to share their purchase.

Setting up EDD Social Checkout

Setting up the Easy Digital Downloads plugin is a simple 2-step process.

1. Configure the sharing options you want

woocommerce-social-checkout-2Head to Downloads » Social Checkout. You’ll see the config screen. Here you can select the services that you want to promote at checkout.

Simply choose the main heading, then tick the services that you want your customers to share to.

Each service has its own options – simply fill in the details and save the settings when you’re happy. You can come back at any time and change the services, or their options as you want.

2. Add the shortcode to your Purchase Confirmation page in WordPress

Head into your WordPress admin area, and find your Purchase Confirmation page. Simply edit this page and add the [edd_social_checkout] shortcode.

shortcode


You’re done!

Set up guide

Our WP e-Commerce / Mailchimp plugin is simple to set up. Before you start you’ll need just four things to hand:

  • A copy of the plugin itself – you can get it online here – WP e-Commerce / Mailchimp Integration
  • Your Mailchimp API Key and List ID – there’s instructions on how to find them here : (API key)(List ID)
  • Description for a field during checkout where people can opt in during checkout

Once you’ve got the required information to hand, then you’re just a few steps away from being up and running:

Install the plugin

Install the plugin from the ZIP file, and activate it as per a normal WordPress plugin.

Create the checkout fields

Mailchimp encourage you to provide an explicit “opt-in” before you add subscribers to your lists. So that you can honour this, then go into your WP e-Commerce settings, and add a new checkout field, of type checkbox:

sshot-1

Add the appropriate option for the customer to choose, and make sure that the “Value” is set to “Yes”. The plugin will look for that value to decide whether customers should be added to your list or not.

sshot-2

Set-up the plugin

Now, locate the plugin. If you’re using the 3.7.x series of WP e-Commerce, then the link will be under the “Store” menu in your WordPress admin area, for 3.8.x it will be under “Settings”. The link is titled “Store/MC Integration”.

The settings should be fairly straightforward, just choose your checkout field from the drop-down list, enter your Mailchimp account Key, and list ID, and save the settings.

settings

That’s it – from now on, every customer will be automatically added to your chosen list, provided they opt in.

Installation & set up

Getting set up is pretty straightforward:

Step 1 – Install & activate the plugin

Install & activate the plugin as you would any normal plugin. If in doubt – check out the the plugin installation article in the WordPress Codex.

Step 2 – Configure your social sharing settings

wpec-social-settingsLog into your WordPress admin area, and go to Settings » Social Checkout. You’ll see the Social Checkout settings screen.

These are the only settings you need to configure – so you’ll soon be up and running.

First – set the heading – this will be used to introduce the social sharing block after checkout.

Once you’ve done that you need to choose which social networks you want to offer. This will depend on your business, and which networks are most popular with your customers. Each network may have it’s own specific settings, such as choosing whether to display the light or dark Facebook widget, or setting your Twitter name.

Step 3 – Add the shortcode to your transaction results page

Edit your transaction results page and add the shortcode [wpec-social-checkout] where you want the social sharing links to appear.

wpec-social-shortcode

Mailcheck for WordPress e-Commerce

The Mailcheck jQuery plugin is a fantastic bit of code that suggests corrections to domains when your users misspell it in an email address. For example, if someone  types in “user@hotnail.con”, Mailcheck will suggest “user@hotmail.com”.

This is perfect for situations where you want to make sure that customers give you accurate email addresses – e-Commerce checkouts for example.

We’ve wrapped up the Mailcheck library into a WordPress plugin below that integrates automatically with all of the major WordPress e-Commerce systems, including WP e-Commerce, WooCommerce, and Jigoshop.

kicksend

Get it from WordPress.org now.

Mailcheck / WooCommerce

We’ve wrapped up the Mailcheck library into a WordPress plugin below that integrates automatically with WooCommerce.

The Mailcheck jQuery plugin is a fantastic bit of code that suggests corrections to domains when your users misspell it in an email address. For example, if someone  types in “user@hotnail.con”, Mailcheck will suggest “user@hotmail.com”.

By using the e-Commerce / Mailcheck plugin, you’ll get these suggestions automatically in your WooCommerce checkout – just checkout the screenshot below:

kicksend

Get it from WordPress.org now.

Mailcheck / WP e-Commerce

We’ve wrapped up the Mailcheck library into a WordPress plugin below that integrates automatically with WP e-Commerce.

The Mailcheck jQuery plugin is a fantastic bit of code that suggests corrections to domains when your users misspell it in an email address. For example, if someone  types in “user@hotnail.con”, Mailcheck will suggest “user@hotmail.com”. By using the e-Commerce / Mailcheck plugin, you’ll get these suggestions automatically in your WP e-Commerce checkout – just checkout the screenshot below:

kicksend

Get it from WordPress.org now.

Installation

Our WP e-Commerce Dashboard plugin is simple to set up. Before you start you’ll need just two things to hand:

Log into your WordPress site as normal, and install the plugin as you would any other WordPress plugin. Activate the plugin, and you’re off!

Widgets

The plugin will add it’s default widgets to your site’s dashboard. The following widgets will be added by default:

  • E-Commerce Sales
  • E-Commerce Revenue
  • E-Commerce Recent Orders
  • E-Commerce Items to Ship
  • E-Commerce Recent Ratings
  • E-Commerce Product Sales

These widgets can be drag and dropped around as per any other dashboard widgets.

You can also turn off individual widgets if you want, using the standard WordPress “Screen Options” tab in the top right of your dashboard.

Sales Export

The sales export functionality can be access from your WordPress admin area, you should find a new menu item called “Store Sales” under your main Dashboard menu. You can export “Order details”, or “Order line details” depending on whether you need order totals, or he line-by-line product detail.

If you need the data regularly, you can also access the “Scheduled Sales Export” menu to set up automatic scheduled exports to run and be delivered by email, or dumped out to a file on your server.